Spring
Inversion of control
The approach of outsourcing(外包) the construction and management of objects(outsource to a object factory).
下面这段程序是一个普通的java程序
1 | public class MyApp { |
Java编程中我们通常直接使用new创建一个新的对象,这样类和类之间存在高耦合,也就是说如果我们想要此时不想要TrackCoach给我们建议而是让其他Coach给我们建议,我们只能更改源代码。而IOC就是为了解决这个问题,对象的创建由Spring Container(Object Factory)帮我们创建。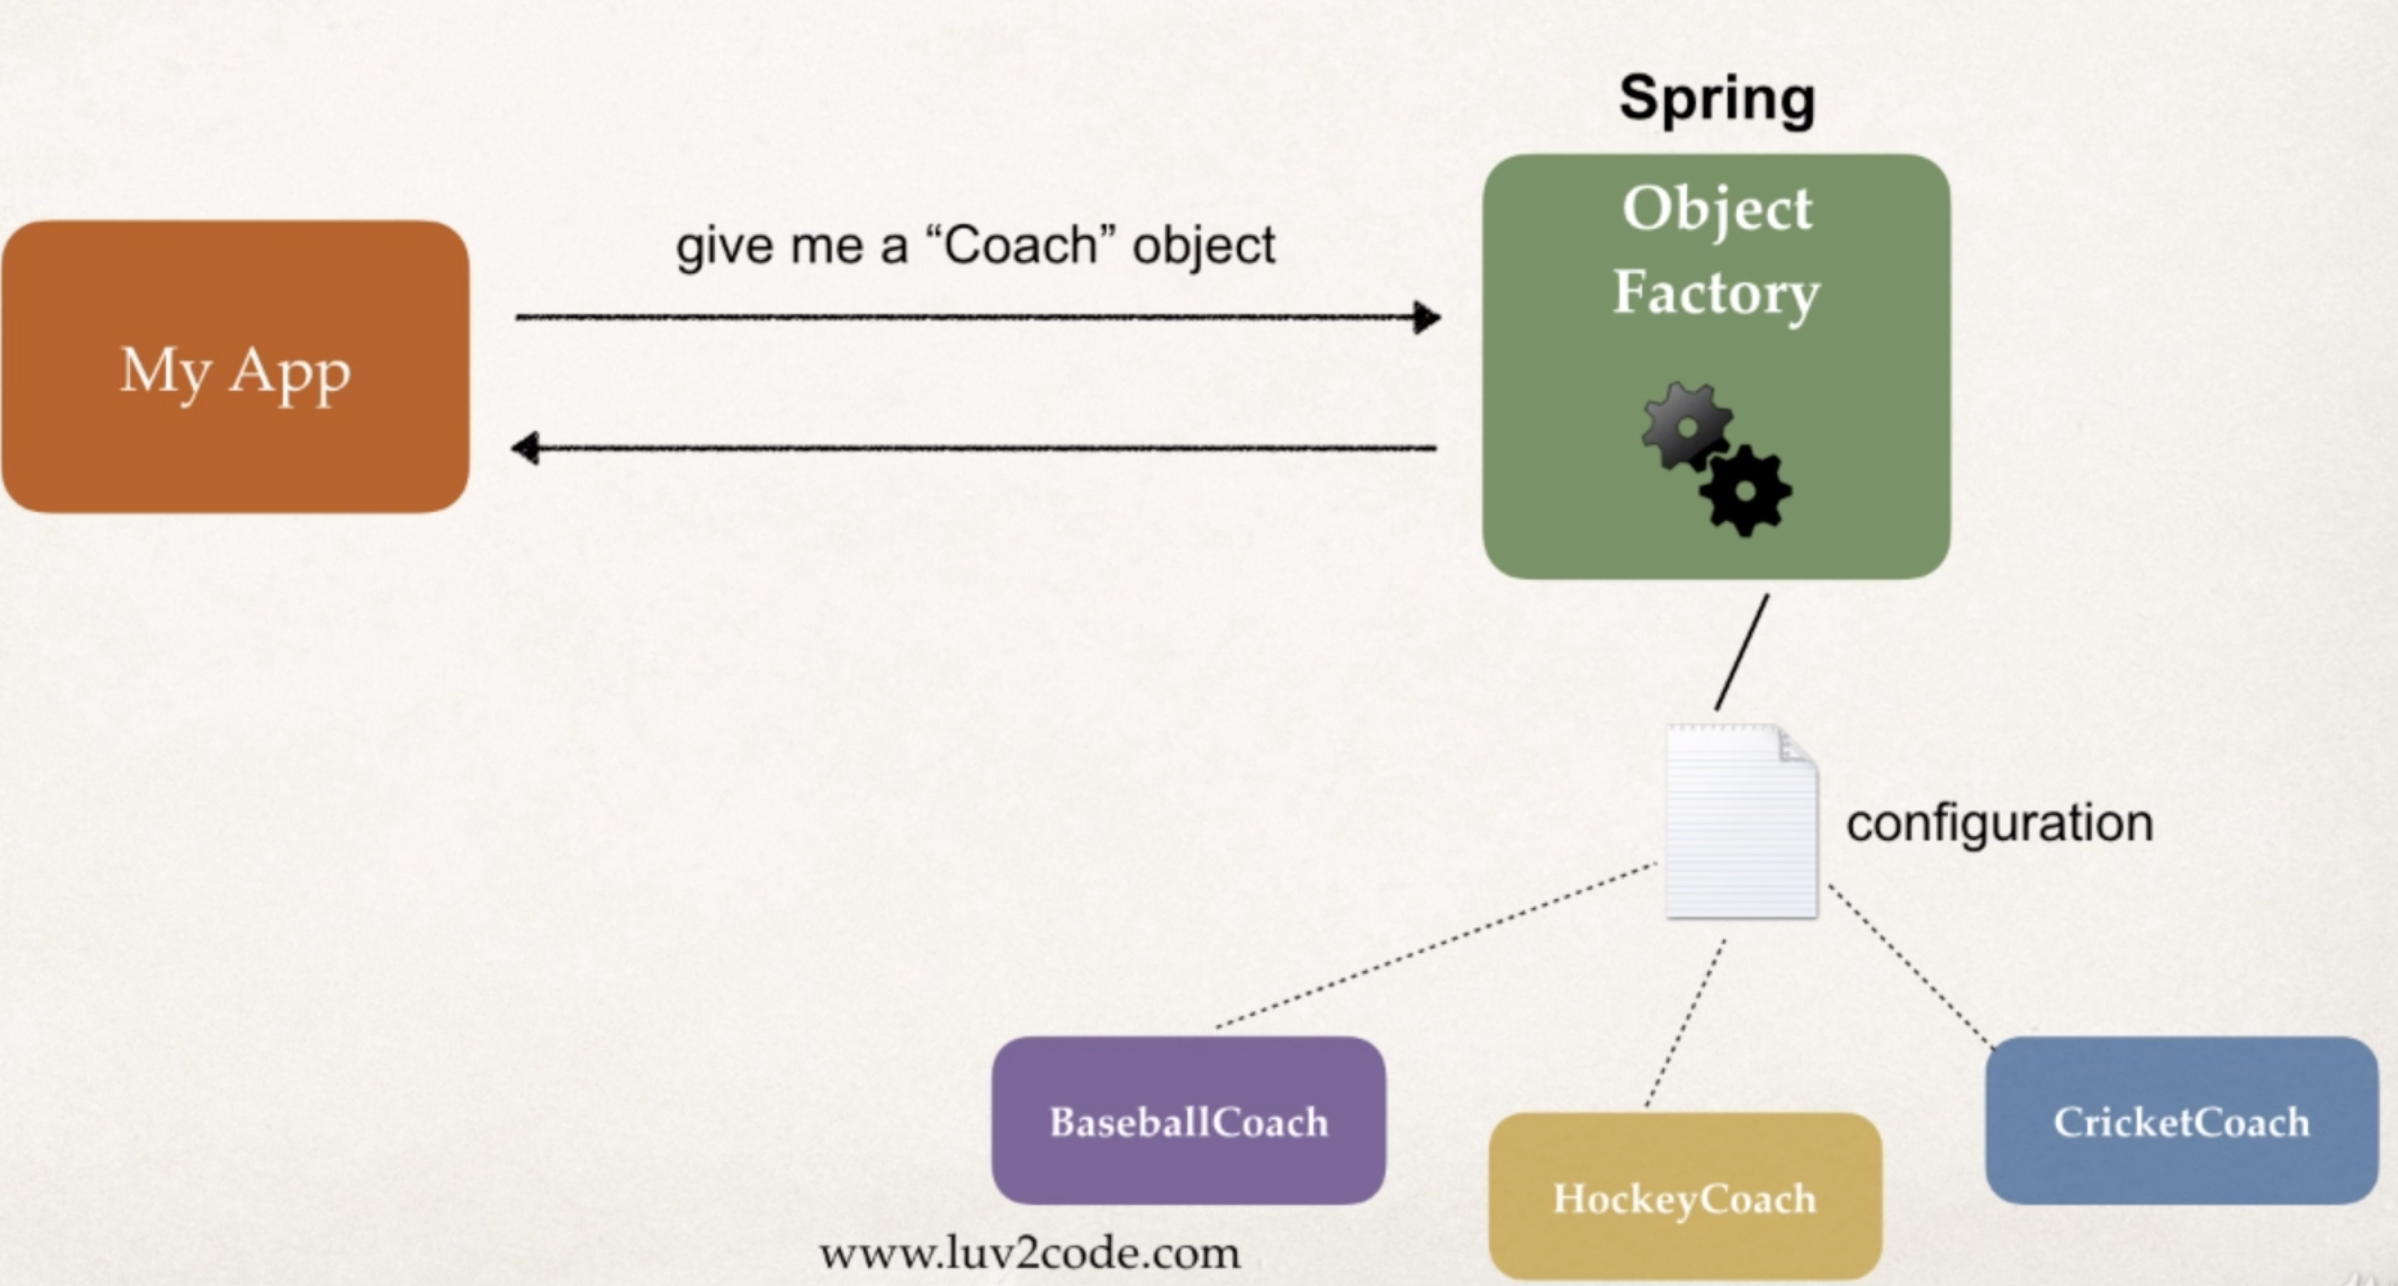
Spring Container的主要功能:1.Create and Manage objects(IOC) 2.Inject object’s dependencies(Dependency Injection)
我们使用Spring Container之前需要进行配置,主要有三种方式:1.XML file(legacy, but most legacy apps use it) 2.Java annotation(modern) 3.Java source code(modern)
XML file configuration
IOC Spring程序的开发流程:
1.Configure your Spring Beans
什么是Spring Beans?
A “Spring Bean” is simply a Java object.
When Java objects are created by the Spring Container, then Spring refers to them as “Spring Beans”.
1 | <bean id="myCoach" class="com.luv2code.springdemo.TrackCoach"> |
2.Create a Spring Container
Spring Container is generally known as ApplicationContect. 它有一些具体的实现: ClassPathXmlApplicationContext, AnnotationApplicationContext, GenericWebApplicationContext…
这里我们先用xml配置的这种。
3.Retrieve Beans from Spring Container
1 | package com.luv2code.springdemo; |
Coach theCoach = context.getBean("myCoach", Coach.class);, 这里我们在getBean方法后面加上Coach.class,spring会自动帮我们进行类型转换, 这样比直接自己手动转换Coach theCoach = (Coach) context.getBean("myCoach");的好处是provides a measure of type safety by throwing a BeanNotOfRequiredTypeException if the bean is not of the required type.
Java Annotation
Java Annotations are special labels/marks added to Java classes whcih provide meta-data about the class and proceed at compile time or run-time for special processing.
Thus spring will scan java classes for special annotations and automatically register the beans in the Spring container.
所以使用Java Annotations开发IOC Spring程序的流程是:
- Enable component scanning in Spring config file.
1
2
3
4
5
6
7
8
9
10
11
12
13
<beans xmlns="http://www.springframework.org/schema/beans"
xmlns:xsi="http://www.w3.org/2001/XMLSchema-instance"
xmlns:context="http://www.springframework.org/schema/context"
xsi:schemaLocation="http://www.springframework.org/schema/beans
http://www.springframework.org/schema/beans/spring-beans.xsd
http://www.springframework.org/schema/context
http://www.springframework.org/schema/context/spring-context.xsd">
<!-- add entry to enable component running -->
<context:component-scan base-package="com.luv2code.springdemo"></context:component-scan>
</beans> - Add
@ComponentAnnotation to your java classes.1
2
3
4
5
6
7
8
9package com.luv2code.springdemo;
import org.springframework.stereotype.Component;
public class TennisCoach implements Coach {
public String getDailyWorkout() {
return "Practise your backhand volley";
}
} - Retrieve Beans from Spring Container.
1
2
3
4
5
6
7
8
9
10
11
12
13
14
15
16package com.luv2code.springdemo;
import org.springframework.context.support.ClassPathXmlApplicationContext;
public class AnnotationDemoApp {
public static void main(String[] args) {
//read spring config file
ClassPathXmlApplicationContext context = new ClassPathXmlApplicationContext("applicationContext.xml");
//get the bean from spring container
Coach theCoach = context.getBean("thatSillyCoach", Coach.class);//这里的名字就是我们在annotation定义的ID
//call a method on the bean
System.out.println(theCoach.getDailyWorkout());
//close the context
context.close();
}
}
Spring也支持不写Bean ID,那么它默认的Bean ID就是class name的首字母小写:比如TennisCoach类,那么我们用的时候就是”tennisCoach”
Dependency Injection
Dependency Injection指的是如果我们跟object factory要一个car object,car object由许多包括tire object, seat object, engine object组成,那么object factory会自动帮我们组装好,这就是依赖注入。
“dependency” is the same thing as “helper objects”.
Injection Types: 1. Construction Injection 2. Setter Injection 3.auto-wiring(in annotation section)
XML configurarion - Construction injection
Construction injection的开发流程:
- Define the dependency interface and class
1
2
3
4
5
6
7package com.luv2code.springdemo;
public class HappyFortuneService implements FortuneService {
public String getFortune() {
return "Today is your lucky day";
}
} - Create a constructor in your class for injections
1
2
3
4
5
6
7
8
9
10
11
12
13
14
15
16
17
18
19
20package com.luv2code.springdemo;
public class BaseballCoach implements Coach{
//define a private field for the dependency
private FortuneService fortuneService;
//define a constructor for dependency injection
public BaseballCoach(FortuneService theFortuneService) {
this.fortuneService = theFortuneService;
}
public String getDailyWorkout() {
return "Spend 30 minutes on batting practise";
}
public String getDailyFortune() {
//use my fortuneService to get a fortune
return fortuneService.getFortune();
}
} - Configure the dependency injdection in spring config file当我们配置好后,这个时候再在主程序中执行
1
2
3
4
5
6
7
8<!-- define the dependency(helper object) -->
<bean id="myFortune" class="com.luv2code.springdemo.HappyFortuneService">
</bean>
<bean id="myCoach" class="com.luv2code.springdemo.BaseballCoach">
<!-- set up constructor injection -->
<constructor-arg ref="myFortune" />
</bean>Coach theCoach = (Coach) context.getBean("myCoach");,这个时候spring container(object factory)就会按照IOC和DI把组装好的对象直接给我们用了。
所以Dependency Injection帮我们做了什么呢?
1 | <!-- define the dependency(helper object) --> |
等价于
1 | HappyFortuneService myFortuneService = new HappyFortuneService();//Dependency Injection帮助我们创建helper object,并帮我们注入到我们需要的Bean里面 |
IOC+DI使得我们的程序耦合度非常低,所有的关键信息都在配置文件中体现,我们的程序的高度可复用的!
XML configurarion - Setter injection
Setter Injection的开发流程:
- Define the dependency interface and class
- Create setter method in your class for injection
1
2
3
4
5
6
7
8
9
10
11
12
13
14
15
16
17
18
19
20
21
22
23package com.luv2code.springdemo;
public class CricketCoach implements Coach {
private FortuneService fortuneService;
public CricketCoach() {
System.out.println("Call Cricket Coach Constructor");
}
// our setter method
public void setFortuneService(FortuneService fortuneService) {
System.out.println("Call Cricket Coach setter method");
this.fortuneService = fortuneService;
}
public String getDailyWorkout() {
return "Practise fast bowling for 15 minutes";
}
public String getDailyFortune() {
return fortuneService.getFortune();
}
} - Configure the dependency injdection in spring config filespring会去寻找name属性对应的setter函数进行依赖注入,寻找的原则是set+name(首字母大写),所以这里会去找setFortuneService()这个函数。
1
2
3<bean id="myCricketCoach" class="com.luv2code.springdemo.CricketCoach">
<property name="fortuneService" ref="myFortune"></property>
</bean>
从输出可以看出spring在setter依赖注入时先调用没有参数的constructor,然后调用setter进行依赖注入。
上面依赖注入的是类,如果注入的是String的话则有不一样的用法:
1 | <bean id="myCricketCoach" class="com.luv2code.springdemo.CricketCoach"> |
更好的做法是把value写在properties file。
- create properties file
创建一个sport.properties文件,在里面加入这两行
foo.email = shiyuliucu@gmail.com
foo.team = Sachid - load properties file in spring config file
<context:property-placeholder location="classpath:sport.properties" />
- reference values from properties file
1 |
|
Java Annotations(Autowiring) - Contructor Injection
For dependency injection, Spring can use auto wiring. Spring will look for a class or interface that matches the property. And then, Spring will inject it automatically.
Autowiring的实现过程:Spring会扫描所有的@Component注解,如果发现里面有@autowired注解的成员变量,那么就会去找相对应的实现类并自动进行依赖注入。
开发流程是:
- Define the independency interface and class
- Create a constructor in your class for injection
- Configure the dependency injection with @Autowired Annotation
1
2
3
4
5
6
7
8
9
10
11
12
13
14
15
16
17
18
19
20
21
22
23
24
25package com.luv2code.springdemo;
import org.springframework.beans.factory.annotation.Autowired;
import org.springframework.stereotype.Component;
public class TennisCoach implements Coach {
private FortuneService fortuneService;
public TennisCoach(FortuneService fs) {
this.fortuneService = fs;
}
public String getDailyWorkout() {
return "Practise your backhand volley";
}
public String getDailyFortune() {
return fortuneService.getFortune();
}
}
Java Annotations(Autowiring) - Setter Injection
1 | package com.luv2code.springdemo; |
Java Annotations(Autowiring) - Field Injection
其实最简单的方式是我们直接在class的fields上标注@Autowired,那么他们就会自动进行依赖注入,这是通过java的反射机制完成的。
1 | package com.luv2code.springdemo; |
Java Annotations(Autowiring) - Qualifiers
现在出现了一个很严重的问题:前面我们的接口只有一个实现类,所以spring直到要用这个类进行依赖注入,但是如果对于一个接口有多个实现类呢?这个时候就用到了Qualifiers(限定词)
1 | package com.luv2code.springdemo; |
@Qualifier使用的必须是想用的类的类名(首字母小写)
Some tips
Annotations - Default Bean Names … and the Special Case
In general, when using Annotations, for the default bean name, Spring uses the following rule.
If the annotation’s value doesn’t indicate a bean name, an appropriate name will be built based on the short name of the class (with the first letter lower-cased).
For example:
HappyFortuneService –> happyFortuneService
However, for the special case of when BOTH the first and second characters of the class name are upper case, then the name is NOT converted.
For the case of RESTFortuneService
RESTFortuneService –> RESTFortuneService
No conversion since the first two characters are upper case.
Behind the scenes, Spring uses the Java Beans Introspector to generate the default bean name. Here’s a screenshot of the documentation for the key method.
https://docs.oracle.com/javase/8/docs/api/java/beans/Introspector.html#decapitalize(java.lang.String)
Using @Qualifier with Constructors
@Qualifier is a nice feature, but it is tricky when used with Constructors.
The syntax is much different from other examples and not exactly intuitive. Consider this the “deep end of the pool” when it comes to Spring configuration LOL :-)
You have to place the @Qualifier annotation inside of the constructor arguments.
Here’s an example from our classroom example. I updated it to make use of constructor injection, with @Autowired and @Qualifier. Make note of the code in bold below:
1 | package com.luv2code.springdemo; |
For detailed documentation on using @Qualified with Constructors, see this link in the Spring Reference Manual
https://docs.spring.io/spring/docs/current/spring-framework-reference/core.html#beans-autowired-annotation-qualifiers
How to inject properties file using Java annotations
FAQ: How to inject properties file using Java annotations
Answer:
This solution will show you how inject values from a properties file using annotatons. The values will no longer be hard coded in the Java code.
- Create a properties file to hold your properties. It will be a name value pair.
New text file: src/sport.properties
foo.email=myeasycoach@luv2code.com
foo.team=Silly Java Coders
Note the location of the properties file is very important. It must be stored in src/sport.properties
Load the properties file in the XML config file.
File: applicationContext.xml
Add the following lines:1
<context:property-placeholder location="classpath:sport.properties"/>
This should appear just after the <context:component-scan …/> line
Inject the properties values into your Swim Coach: SwimCoach.java
1
2
3
4
5
private String email;
private String team;
Spring Beans Scopes and Lifecycle
Beans Scopes
Scope指的是Bean对象的作用范围
- How long does a bean live
- How many instances are created
- How is the bean shared
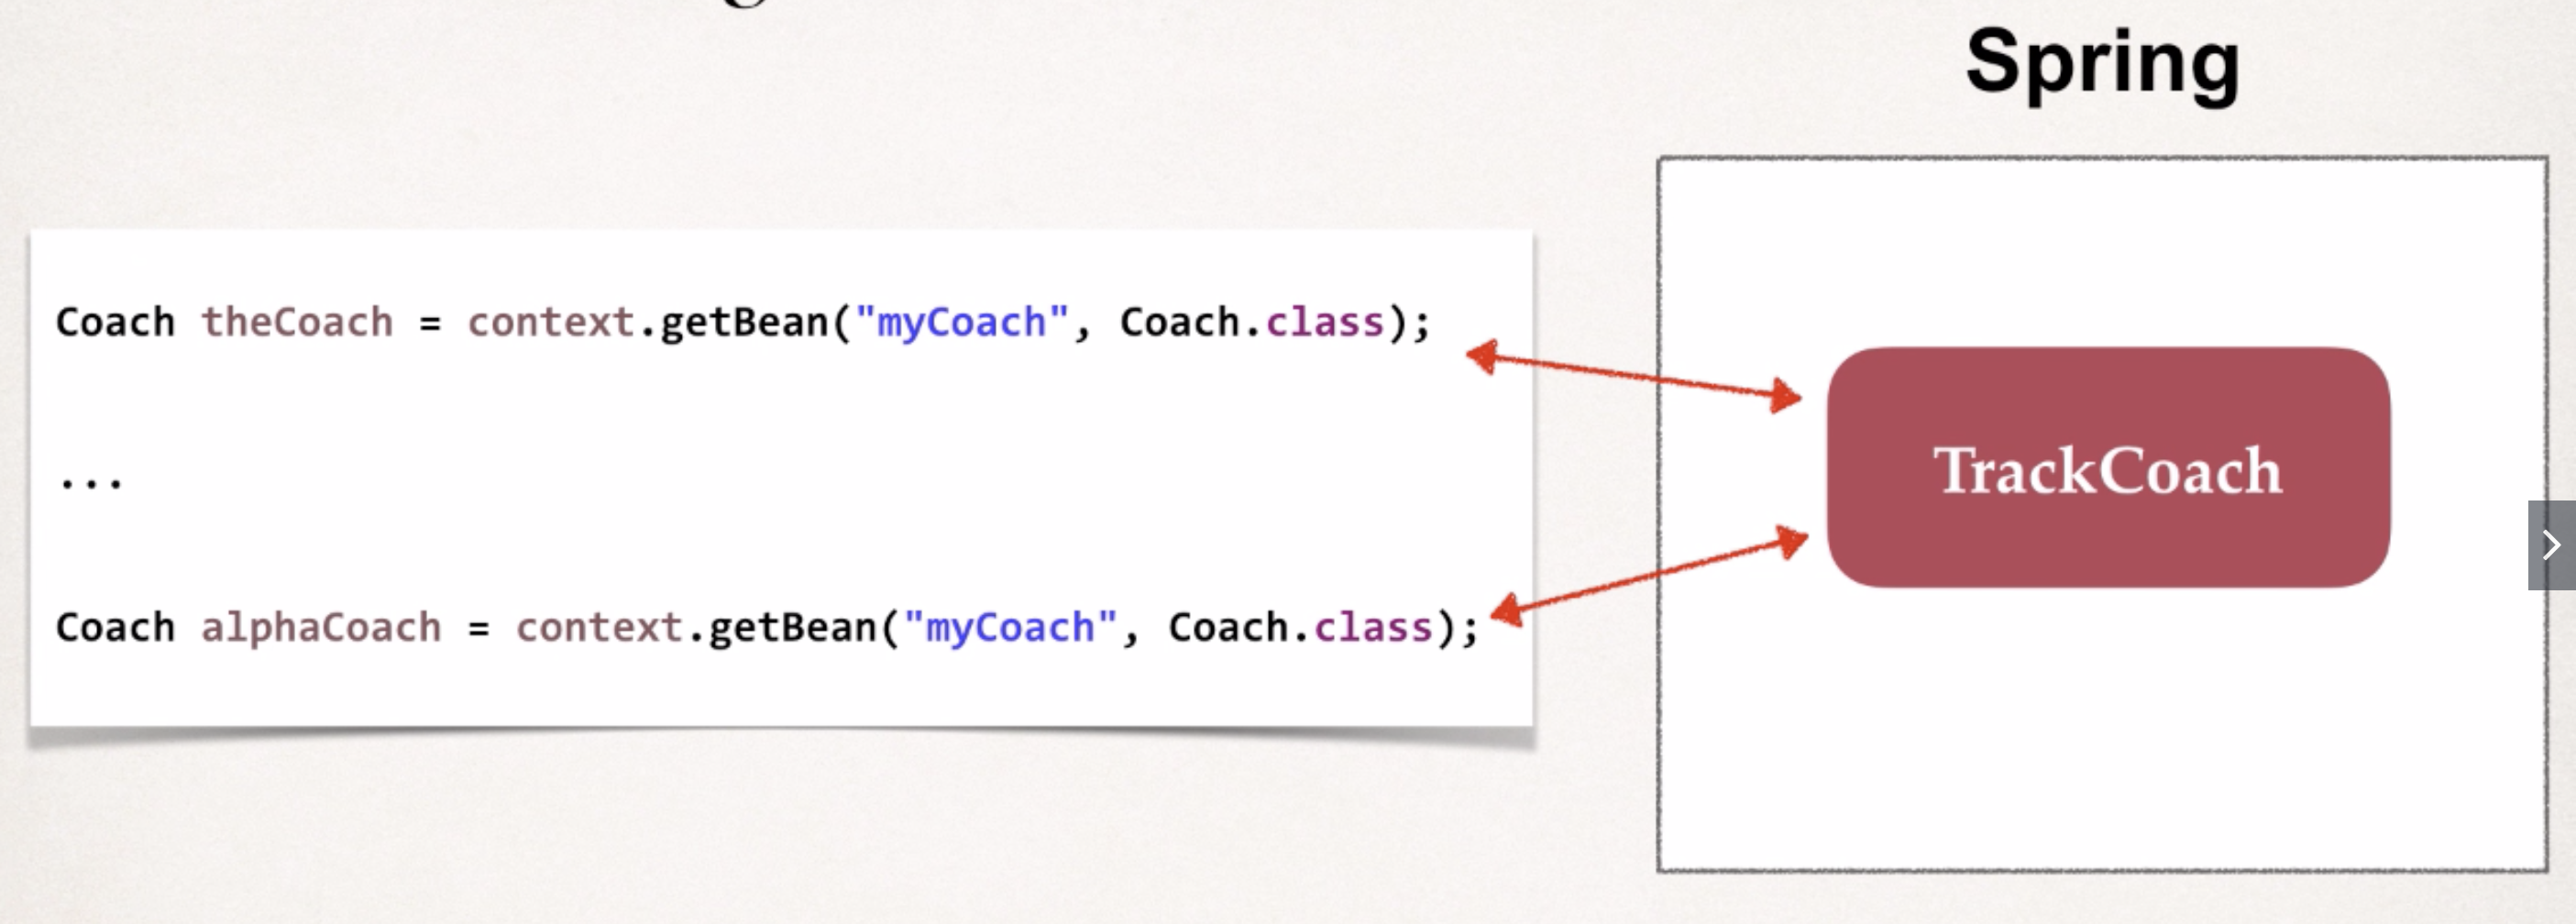
1.默认的作用范围是singleton
- Spring container(Object Factory) 只会默认为这个bean创建一个实例
- It is cashed in memory
- All requests for the bean will return a SHARED reference to the same BEAN
2.prototype: Creates a new bean instance for each container request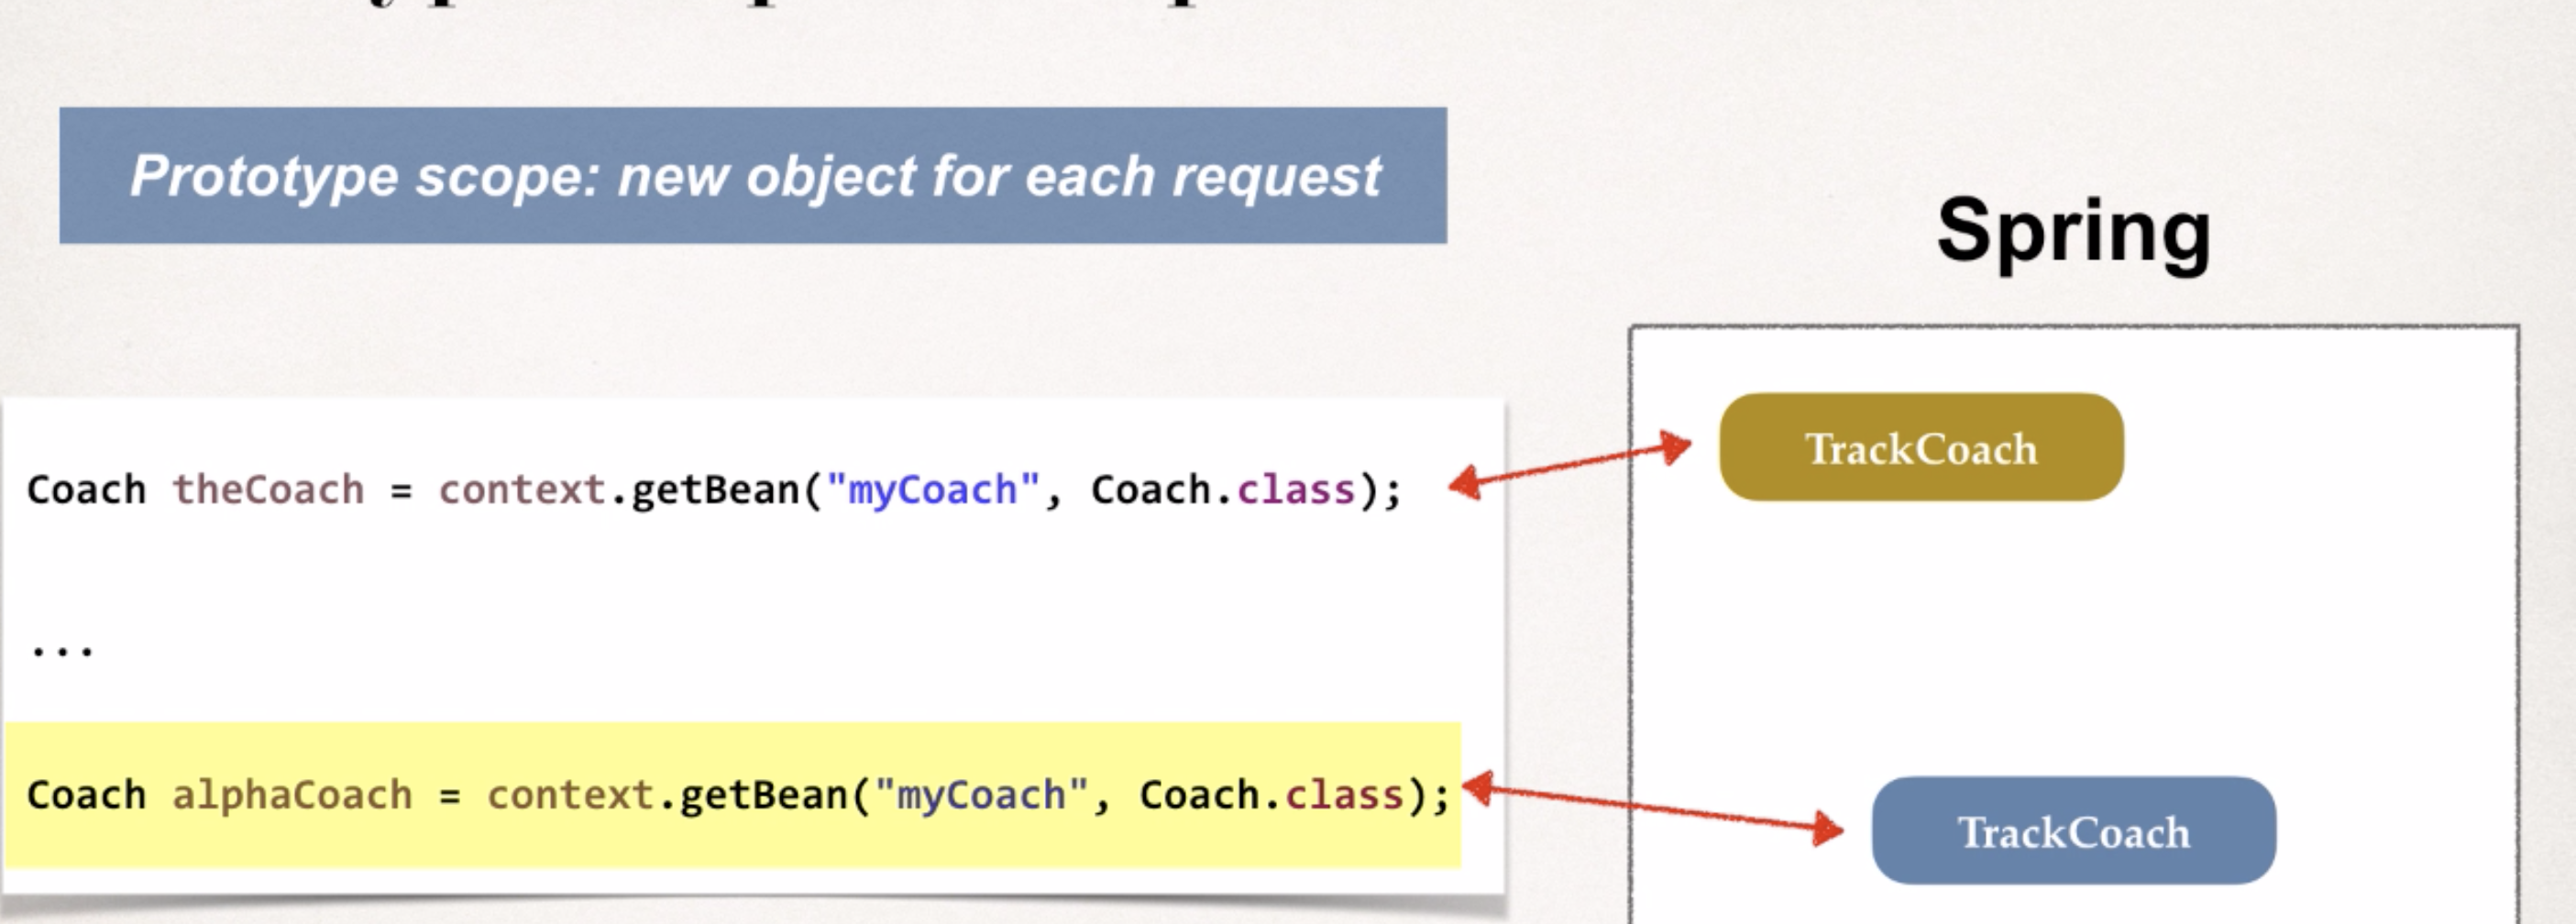
3.request: Scoped to a HTTP web request. Only used for web apps.
4.session: Scoped to a HTTP web session. Only used for web apps.
5.global-session: Scoped to a global HTTP web session. Only used for web apps.
1 | package com.luv2code.springdemo; |
singleton模式下结果是true,prototype模式下结果是false。
我们也可以使用Anotation @Scope:
1 | package com.luv2code.springdemo; |
Beans lifecycle
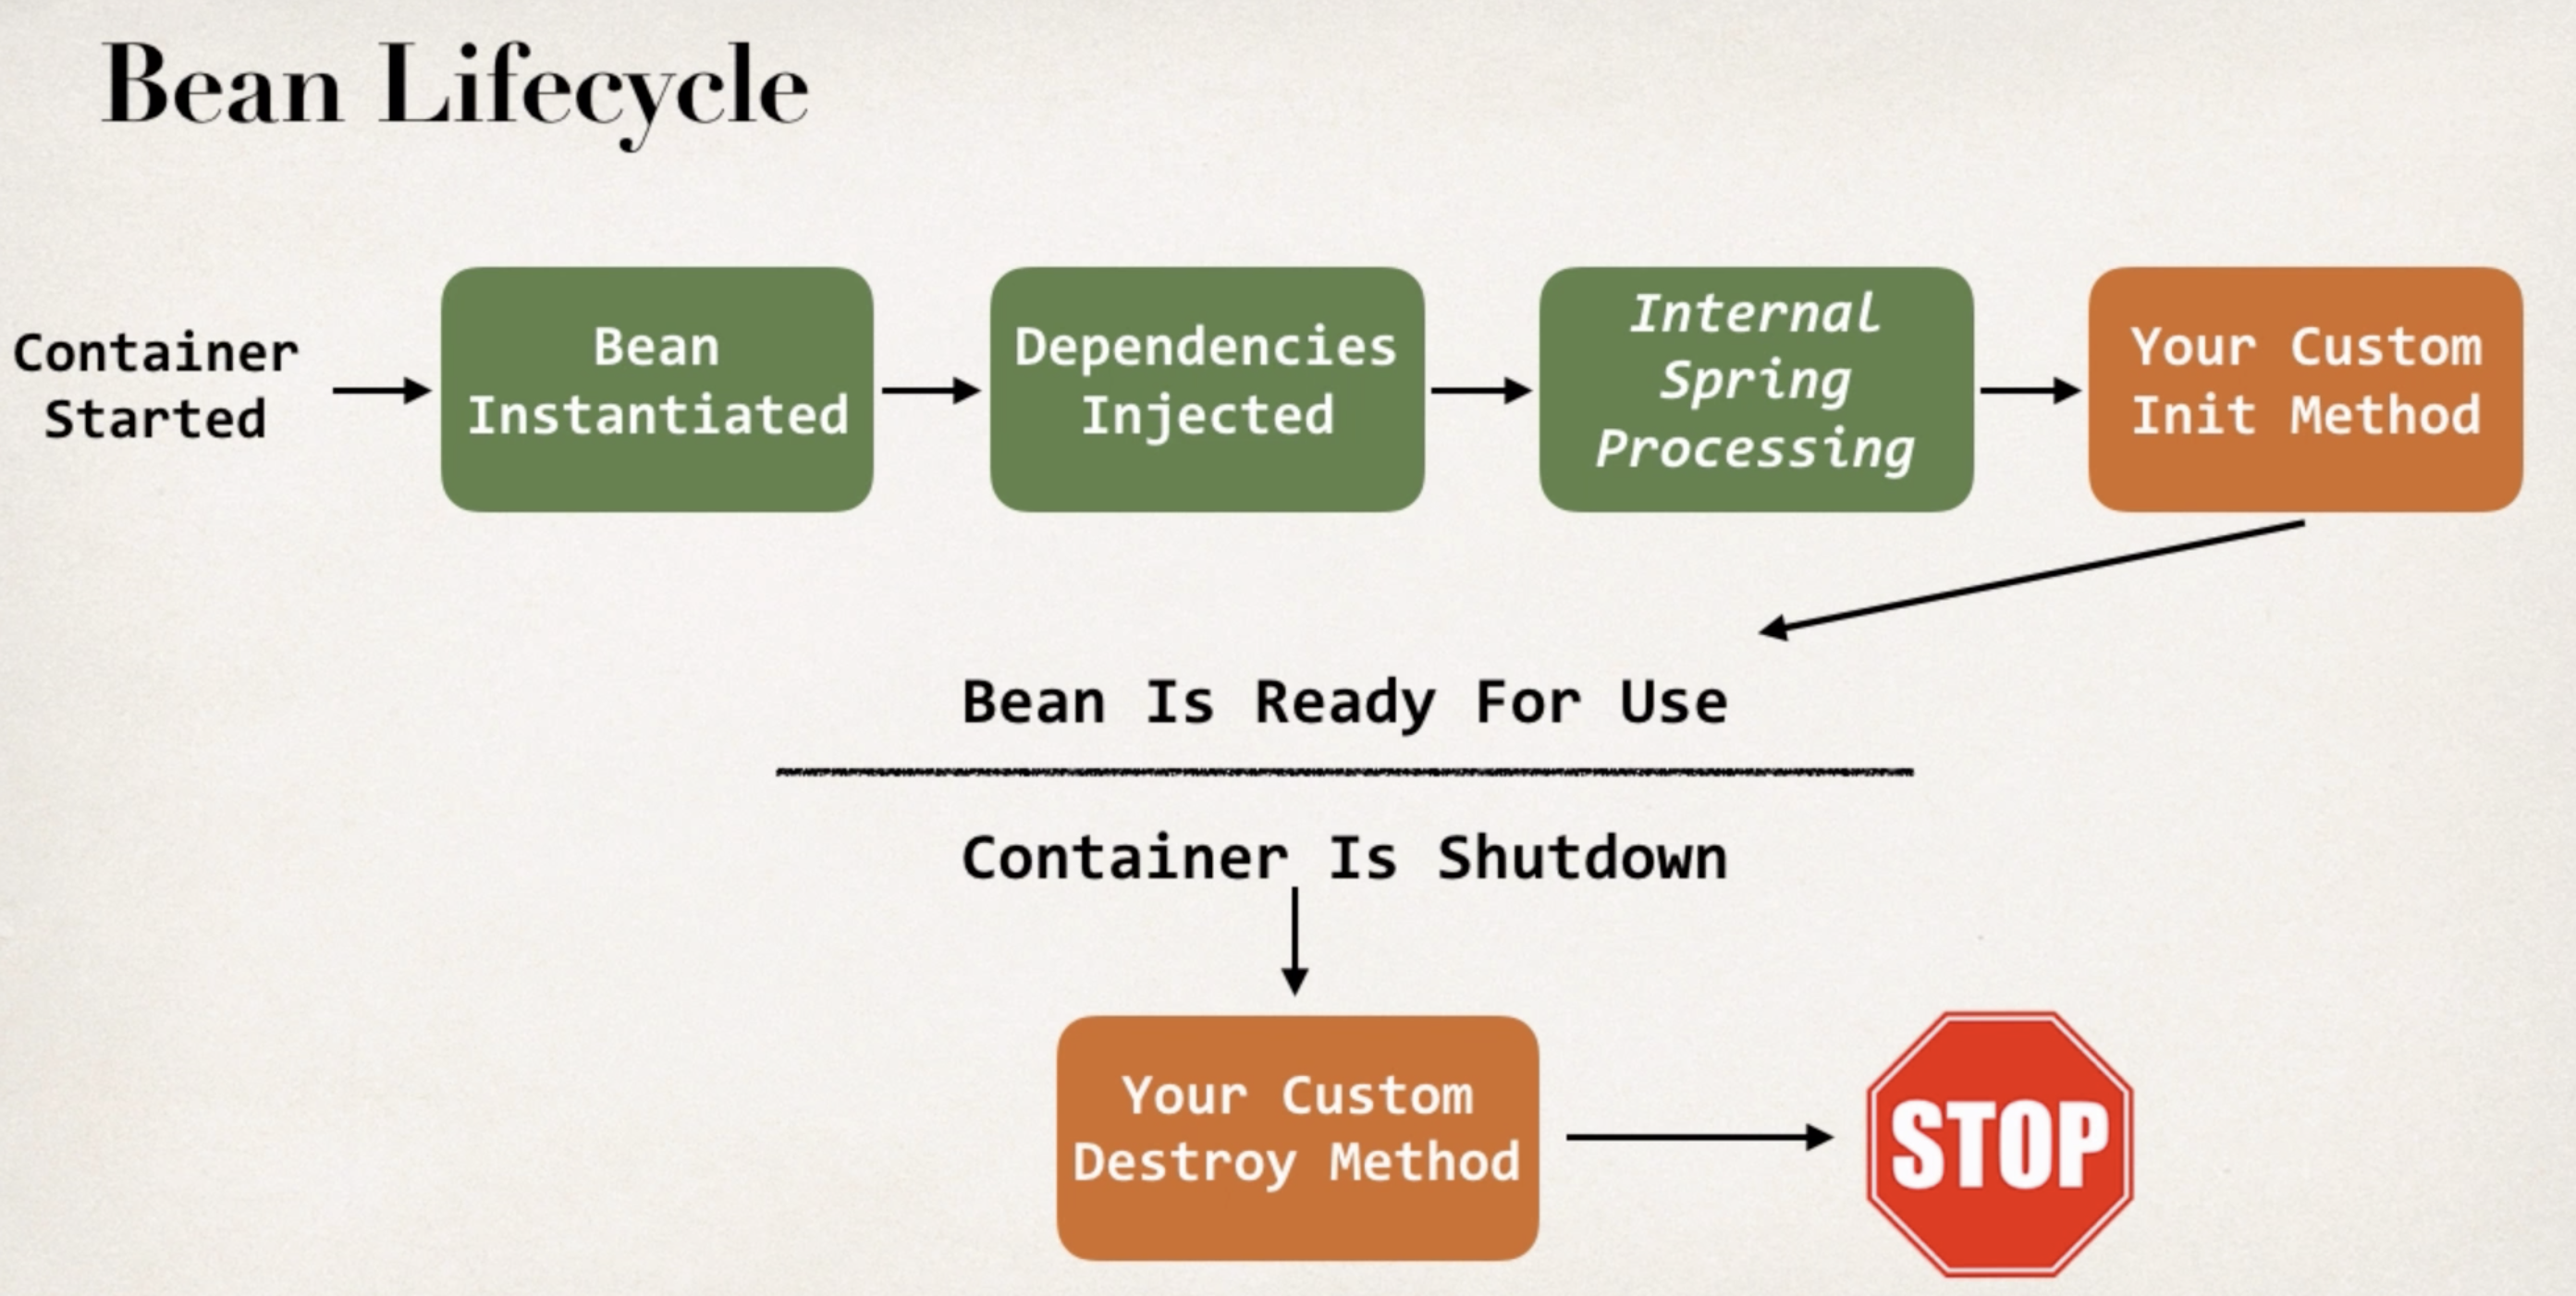
we can add custom code during bean intialization
- calling custom business logic method
- setting up handles to resources(db, sockets, file, etc)
we can add custom code during bean destruction
- calling custom business logic method
- cleaning up handles to resources(db, sockets, file, etc)
使用initialization和destruction的方法是先定义init或者destroy函数,然后再spring配置文件中进行配置。
1 | <bean id="myCoach" class="com.luv2code.springdemo.TrackCoach" |
我们也可以使用Annotation:@PostConstruct and @PreDestroy
Special Note about @PostConstruct and @PreDestroy Method Signatures
I want to provide additional details regarding the method signatures of @PostContruct and @PreDestroy methods.
Access modifier
The method can have any access modifier (public, protected, private)
Return type
The method can have any return type. However, “void’ is most commonly used. If you give a return type just note that you will not be able to capture the return value. As a result, “void” is commonly used.
Method name
The method can have any method name.
Arguments
The method can not accept any arguments. The method should be no-arg.
1 | package com.luv2code.springdemo; |
Spring Configuration with java code(no xml)
3 ways to configure Spring Container:
- Full xml config
- xml Component scan + Annotation
- Java configuration class
开发流程:
- Create a Java Class and annotate as @Configuration
- Add component scanning support: @ComponentScan(optional)
1
2
3
4
5
6
7
8
9
10package com.luv2code.springdemo;
import org.springframework.context.annotation.ComponentScan;
import org.springframework.context.annotation.Configuration;
public class SportConfig {
} - Read Spring Configuration class
- Retrieve bean from Spring container
1
2
3
4
5
6
7
8
9
10
11
12
13
14
15
16
17
18package com.luv2code.springdemo;
import org.springframework.context.annotation.AnnotationConfigApplicationContext;
public class JavaConfigDemoApp {
public static void main(String[] args) {
//read spring config file
AnnotationConfigApplicationContext context = new AnnotationConfigApplicationContext(SportConfig.class);
//get the bean from spring container
Coach theCoach = context.getBean("thatSillyCoach", Coach.class);
//call a method on the bean
System.out.println(theCoach.getDailyWorkout());
System.out.println(theCoach.getDailyFortune());
//close the context
context.close();
}
}
Java config的方式不仅可以定义Spring Container,也可以定义Bean Object
开发流程:
- Define method to expose bean using @Bean
- Inject bean dependencies
1
2
3
4
5
6
7
8
9
10
11
12
13
14
15
16
17
18
19
20
21
22package com.luv2code.springdemo;
import org.springframework.context.annotation.Bean;
//import org.springframework.context.annotation.ComponentScan;
import org.springframework.context.annotation.Configuration;
//@ComponentScan("com.luv2code.springdemo") 因为我们定义好Bean了,所以也不需要自动扫描了
public class SportConfig {
//define bean for our sad fortune service
public FortuneService sadFortuneService() {//函数名是Bean id
return new SadFortuneService();
}
//define bean for our swim coach AND inject dependency
public Coach swimCoach() {
return new SwimCoach(sadFortuneService());
}
} - Read Spring Java configuration class
- Retrieve bean from Spring Container
1
2
3
4
5
6
7
8
9
10
11
12
13
14
15
16
17
18package com.luv2code.springdemo;
import org.springframework.context.annotation.AnnotationConfigApplicationContext;
public class SwimJavaConfigDemoApp {
public static void main(String[] args) {
//read spring config file
AnnotationConfigApplicationContext context = new AnnotationConfigApplicationContext(SportConfig.class);
//get the bean from spring container
Coach theCoach = context.getBean("swimCoach", Coach.class);
//call a method on the bean
System.out.println(theCoach.getDailyWorkout());
System.out.println(theCoach.getDailyFortune());
//close the context
context.close();
}
}
使用java code从properties file中读取数据也是可以的。
开发流程是:
- Create properties file
- Load properties file in Spring Config
1
2
3
4
5
6
7
8
9
10
11
12
13
14
15
16
17
18
19
20
21package com.luv2code.springdemo;
import org.springframework.context.annotation.Bean;
import org.springframework.context.annotation.Configuration;
import org.springframework.context.annotation.PropertySource;
public class SportConfig {
//define bean for our sad fortune service
public FortuneService sadFortuneService() {//函数名是Bean id
return new SadFortuneService();
}
//define bean for our swim coach AND inject dependency
public Coach swimCoach() {
return new SwimCoach(sadFortuneService());
}
} - Reference Value from Properties File
1
2
3
4
5
6
7
8
9
10
11
12
13
14
15
16
17
18
19
20
21
22
23
24
25
26
27
28
29
30
31
32
33
34
35
36package com.luv2code.springdemo;
import org.springframework.beans.factory.annotation.Value;
public class SwimCoach implements Coach {
private FortuneService fortuneService;
private String email;
private String team;
public String getEmail() {
return email;
}
public String getTeam() {
return team;
}
public SwimCoach(FortuneService fs) {
this.fortuneService = fs;
}
public String getDailyWorkout() {
return "Swim 1000 meters as a wram up";
}
public String getDailyFortune() {
return this.fortuneService.getFortune();
}
}
Spring MVC
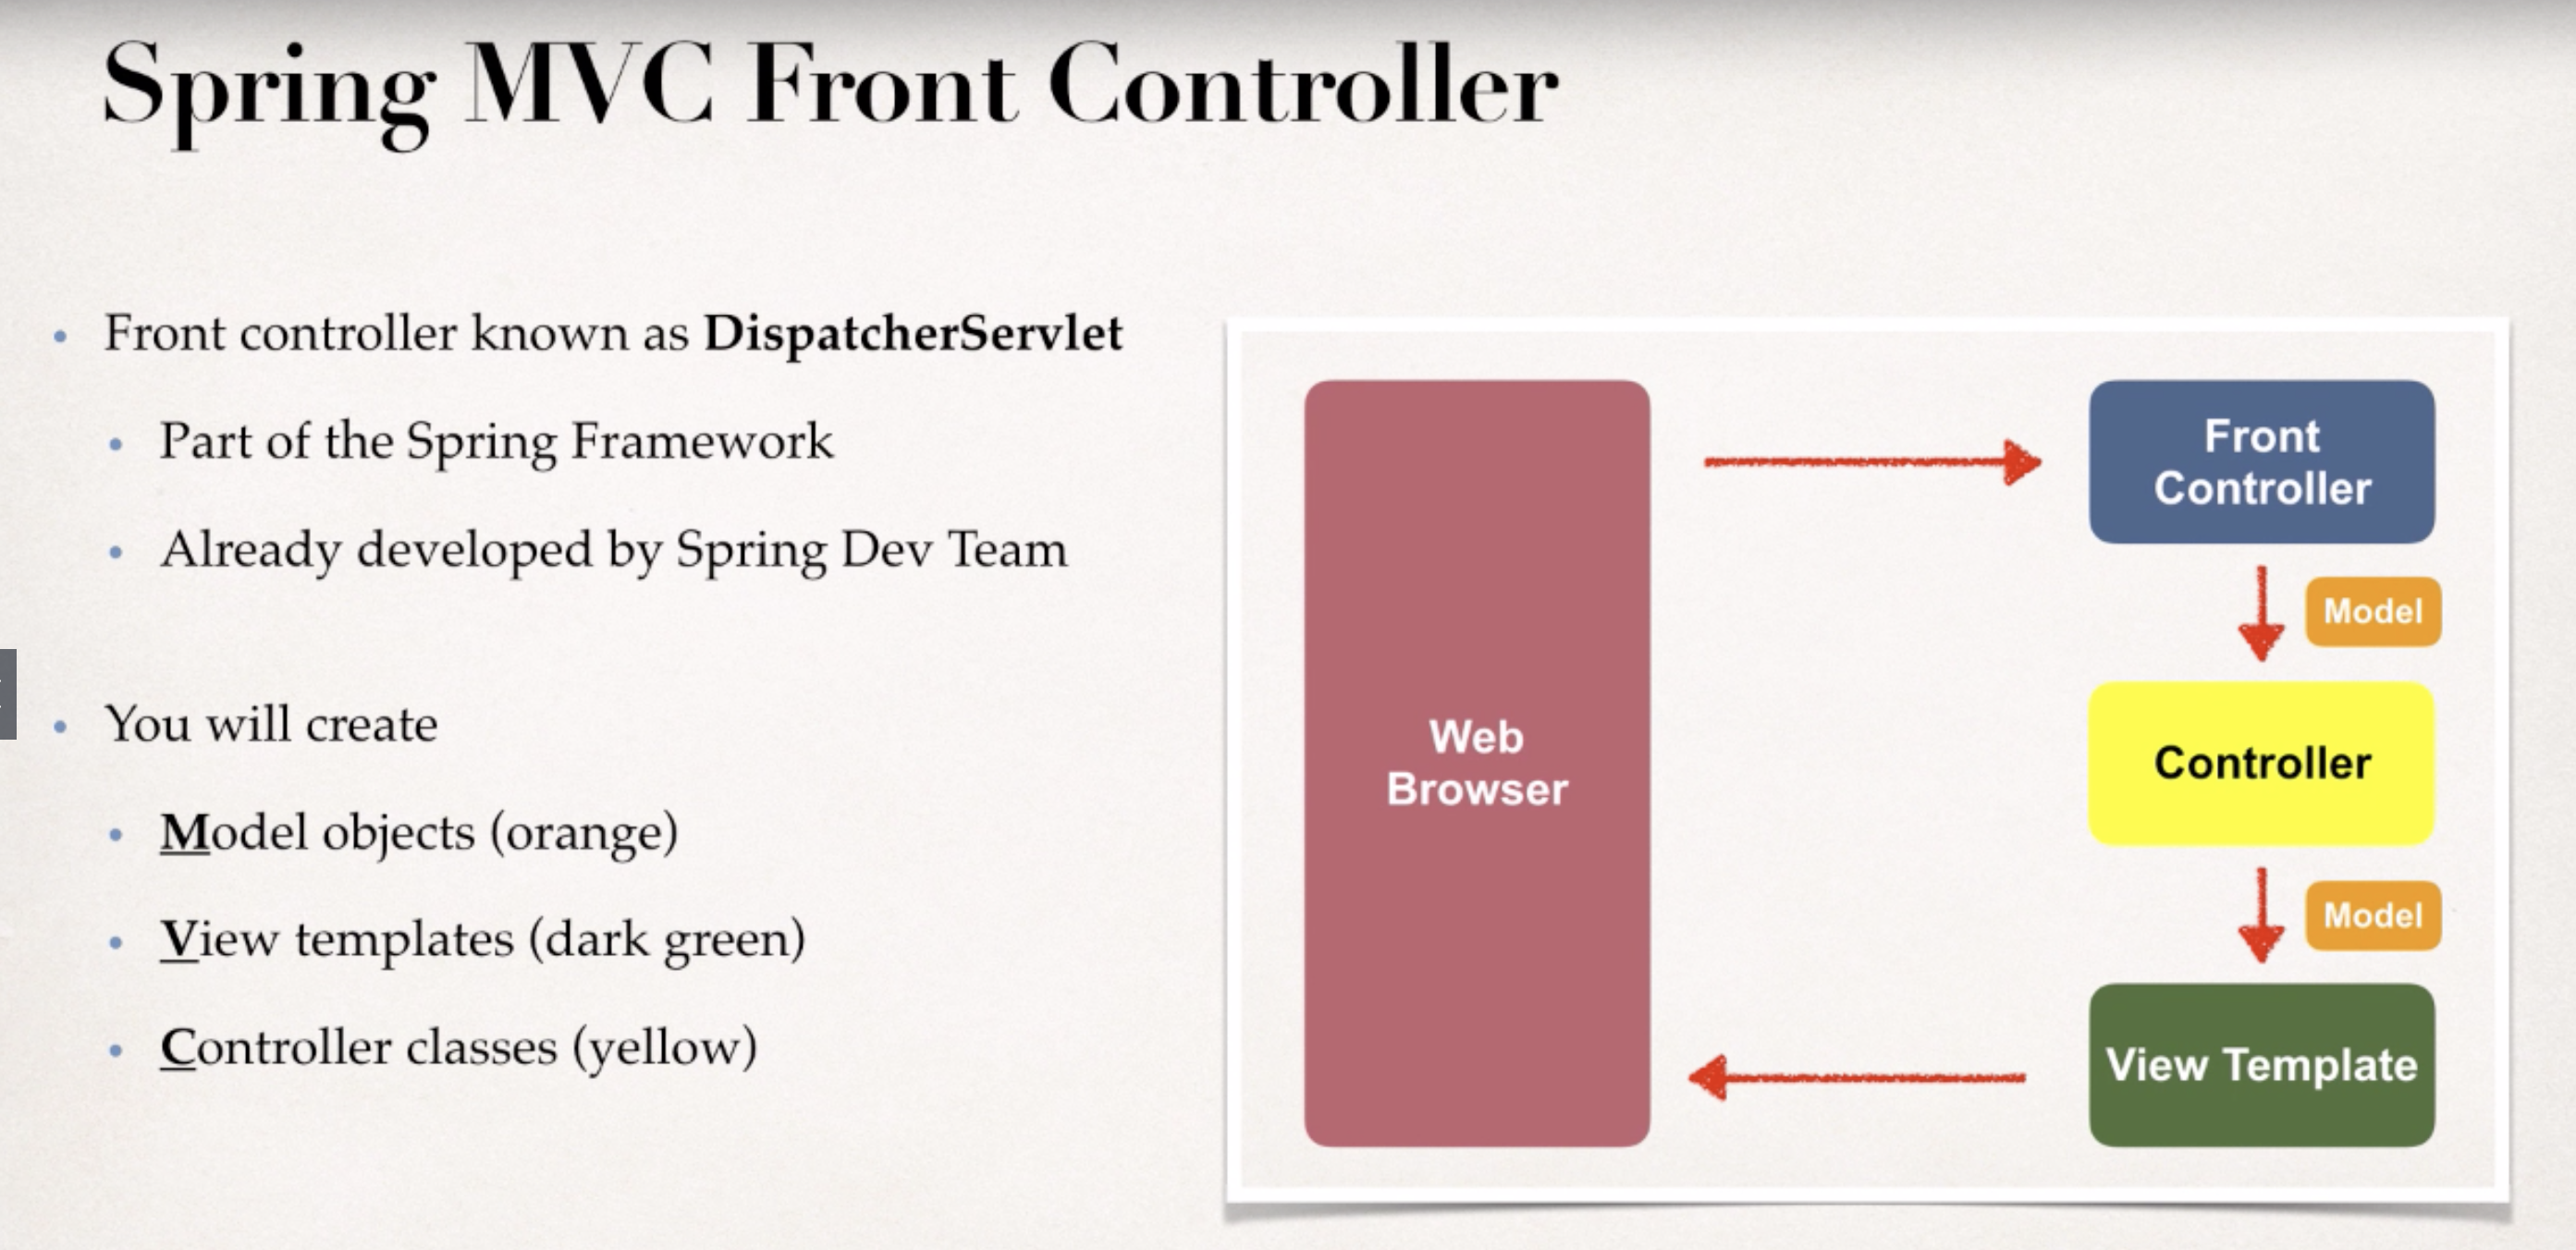
- Controller
- Code created by developer
- Contains your business logic
- handle the request
- store/retrieve data(db, web service…)
- place data in a model
- send to appropriate view template
- Model
- contains your data
- store/retrieve data via backend systems
- database, wev services …
- using a spring bean if you like
- place your data in the model
- data can be any java object/collection
- View Template
- Spring MVC is flexible
- support many view templates
- Most common is JSP+JSTL
- developer creates a page
- display data
- Spring MVC is flexible
Configuration
因为所有的java web项目本质上都是对servlets的封装并加入一些方便程序员编写的特性,所以配置SpringMVC的第一步就是在web.xml文件中配置Spring写好的DispatcherServlet,Servlet的相关知识包含在在Servlets and JSPs的课程里。
- JAR configuration: 将所需的jar file放入WebContent/WEBINF/lib中,eclipse自动将他们加载到项目的classpath中。所需的jar有spring core的jar和JSTL的jar
- web.xml(配置servlet)
1
2
3
4
5
6
7
8
9
10
11
12
13
14
15
16
17
18
19
20
21
22
23
24
25
26
27
28
29
30
31
32
<web-app xmlns:xsi="http://www.w3.org/2001/XMLSchema-instance"
xmlns="http://xmlns.jcp.org/xml/ns/javaee"
xsi:schemaLocation="http://xmlns.jcp.org/xml/ns/javaee http://xmlns.jcp.org/xml/ns/javaee/web-app_3_1.xsd"
id="WebApp_ID" version="3.1">
<display-name>spring-mvc-demo</display-name>
<absolute-ordering />
<!-- Spring MVC Configs -->
<!-- Step 1: Configure Spring MVC Dispatcher Servlet -->
<servlet>
<servlet-name>dispatcher</servlet-name>
<servlet-class>org.springframework.web.servlet.DispatcherServlet</servlet-class>
<init-param>
<!-- servlet在启动前扫描spring-mvc-demo-servlet.xml的配置进行IOC和DI -->
<param-name>contextConfigLocation</param-name>
<param-value>/WEB-INF/spring-mvc-demo-servlet.xml</param-value>
</init-param>
<load-on-startup>1</load-on-startup>
</servlet>
<!-- Step 2: Set up URL mapping for Spring MVC Dispatcher Servlet -->
<!-- 这一句相当于所有访问的指定都会给到spring提供的这个servlet去 -->
<servlet-mapping>
<servlet-name>dispatcher</servlet-name>
<url-pattern>/</url-pattern>
</servlet-mapping>
</web-app> - applicationContext.xml(这个demo里面名字叫spring-mvc-demo-servlet.xml)
1
2
3
4
5
6
7
8
9
10
11
12
13
14
15
16
17
18
19
20
21
22
23
24
25
26
27
28
29
<beans xmlns="http://www.springframework.org/schema/beans"
xmlns:xsi="http://www.w3.org/2001/XMLSchema-instance"
xmlns:context="http://www.springframework.org/schema/context"
xmlns:mvc="http://www.springframework.org/schema/mvc"
xsi:schemaLocation="
http://www.springframework.org/schema/beans
http://www.springframework.org/schema/beans/spring-beans.xsd
http://www.springframework.org/schema/context
http://www.springframework.org/schema/context/spring-context.xsd
http://www.springframework.org/schema/mvc
http://www.springframework.org/schema/mvc/spring-mvc.xsd">
<!-- Step 3: Add support for component scanning -->
<context:component-scan base-package="com.luv2code.springdemo" />
<!-- Step 4: Add support for conversion, formatting and validation support -->
<mvc:annotation-driven/>
<!-- Step 5: Define Spring MVC view resolver -->
<!-- 这里是告诉ViewResolver我们的jsp文件都放在什么地方了,这样SpringMVC才能找到它们。
也就是ViewResolver会自动去/WEB-INF/view/文件夹下去找.jsp文件 -->
<bean
class="org.springframework.web.servlet.view.InternalResourceViewResolver">
<property name="prefix" value="/WEB-INF/view/" />
<property name="suffix" value=".jsp" />
</bean>
</beans>
Create Controllers and Views
Basic Controller开发流程:
- Create Controller Class
对class使用@Controller这个Annotation,@Controller继承自@Component,所以Spring也会自动扫描@Controller的类。 - Define Controller Method
- Add Request Mapping to Controller method
- Return View Name
1
2
3
4
5
6
7
8
9
10
11
12
13package com.luv2code.springdemo.mvc;
import org.springframework.stereotype.Controller;
import org.springframework.web.bind.annotation.RequestMapping;
public class HomeController {
public String showPage() {//函数名,参数都是随意的
return "main-menu"; //由于我们的配置,spring会去找/WEB-INF/view/main-menu.jsp
}
} - Develop View Page
1
2
3
4
5
6
7
8
9
10
11
12<%@ page language="java" contentType="text/html; charset=UTF-8"
pageEncoding="UTF-8"%>
<!DOCTYPE html>
<html>
<head>
<meta charset="UTF-8">
<title>Spring MVC demo - Home Page</title>
</head>
<body>
<h1>Spring MVC demo - Home Page</h1>
</body>
</html>
Question
How does component scan work in this example? You have different package names.
You listed the component scan package as: com.luv2code.springdemo
But the our MVC controllers are defined in com.luv2code.springdemo.mvc
Answer
For the Spring attribute: base-package=”com.luv2code.springdemo”
Spring will recursively scan for components starting at the base package: “com.luv2code.springdemo”
When I say “recursive”, it means that Spring will start at the base package and scan all sub packages.
The package com.luv2code.springdemo.mvc is a sub package because of naming structure, just like folders on a file system.
As a result, it will be included in the scan.
Controller进阶:读取html表格里的数据
HelloWorldController.java
1 | package com.luv2code.springdemo.mvc; |
helloworld-form.jsp
1 | <%@ page language="java" contentType="text/html; charset=UTF-8" |
helloworld.jsp
1 | <%@ page language="java" contentType="text/html; charset=UTF-8" |
Controller进阶:Adding data to the Spring Model
Spring Model:
- The Model is a container for your application data
- In your controller
- You can put anything in a model
- strings, object, info from database, etc…
1 | package com.luv2code.springdemo.mvc; |
- Your view page(JSP) can access data from model
1 | <%@ page language="java" contentType="text/html; charset=UTF-8" |
Controller进阶: How do I use CSS, JavaScript and Images in a Spring MVC Web App?
Here are the steps on how to access static resources in a Spring MVC. For example, you can use this to access images, css, JavaScript files etc.
Any static resource is processed as a URL Mapping in Spring MVC. You can configure references to static resources in the spring-mvc-demo-servlet.xml.
In my example, I’m going to have the following directory structure:
I chose to put everything in the “resources” directory. But you can use any name for “resources”, such as “assets”, “foobar” etc. Also, you can give any name that you want for the subdirectories under “resources”.
Step 1: Add the following entry to your Spring MVC configuration file: spring-mvc-demo-servlet.xml
You can place this entry anywhere in your Spring MVC config file.
<mvc:resources mapping="/resources/**" location="/resources/"></mvc:resources>
Step 2: Now in your view pages, you can access the static files using this syntax:
<img src="${pageContext.request.contextPath}/resources/images/spring-logo.png">
You need to use the JSP expression ${pageContext.request.contextPath} to access the correct root directory for your web application.
Apply the same technique for reading CSS and JavaScript.
Here’s a full example that reads CSS, JavaScript and images.
1 |
|
Request Params and Request Mapping
Bind data using @RequestParam Annotation
上面我们是使用String theName = request.getParameter("studentName");,Spring提供了@RequestParam注解来直接读取request的内容并bind到我们的参数中。
1 |
|
我们需要理解的是:这里我们是因为要对request params进行处理,所以先将request params使用@RequestParam绑定到theName变量上,再将处理后的结果放入model中让我们的前端接收到,但是其实在前端仍旧是可以使用{$param.studentName}去获取最初始的request params的,只不过拿到的是没处理过得!
Controller level Request Mapping
我们可以在Controller层面添加一个Request Mapping,那么我们所有函数的Request Mapping都将相对于这个路径。
Spring MVC Form Tags and data binding
Spring MVC Form Tags are the building block for a web page. Form Tags are configurable and resuable for a web page.
Spring MVC Form Tags can make use of data binding. Automatically setting/retrieving data from a Java Bean/Object.
Text Fields
student-form.jsp
1 | <%@ page language="java" contentType="text/html; charset=UTF-8" |
When form is loaded, Spring MVC will call student.getFirstName(), student.getLastName(). 也就是Spring根据modelAttribute和path去自动调用get函数。
When form is submitted, Spring MVC will call student.setFirstName(), student.setLastName().
Student.java
1 | package com.luv2code.springdemo.mvc; |
StudentController.java
1 | package com.luv2code.springdemo.mvc; |
student-confirmation.jsp
1 | <%@ page language="java" contentType="text/html; charset=UTF-8" |
student.firstName会call student.getFirstName()函数。
我们需要理解的是:这里我们是直接从student-form.jsp把Model传给student-confirmation.form,然后在前端我们直接使用绑定好的{$student.firstName}即可。但是request params仍旧是存在的,我们在前端仍旧可以使用{$param。firstName}来获取数据,只是为了符合MVC里的Model的概念,我们希望在Controller之间传递的是Model而不是一个又一个的参数!
Drop Down Lists
student-form.jsp
1 | <%@ page language="java" contentType="text/html; charset=UTF-8" |
student-confirmation.jsp
1 | <%@ page language="java" contentType="text/html; charset=UTF-8" |
这种写法是吧所有的选项都在jsp里面列出来,但是在我们真正的项目中,我们往往是从数据库中读取数据然后显示一个下拉菜单。
student.java
1 | package com.luv2code.springdemo.mvc; |
student-form.jsp
1 | <%@ page language="java" contentType="text/html; charset=UTF-8" |
Radio buttons
1 | <!-- Radio Buttons --> |
当我们提交form的时候,会call setFavoriteLanguage()函数。
在student-confirmation.jsp页面中的${student.favoriteLanguage}会call student.getFavoriteLanguage()。
Ckeckboxes
student-form.jsp
1 | <%@ page language="java" contentType="text/html; charset=UTF-8" |
Student.java
1 | package com.luv2code.springdemo.mvc; |
由于checkboxes可以选多个,所以这里是数组。
student-confirmation.jsp
1 | <%@ page language="java" contentType="text/html; charset=UTF-8" |
使用jstl去做for loop。
Form Validation
Java’s Standard Bean Validation API:
- Java has a standard Bean validation API
- defines a metadata model and API for entity validation
- not tied to either the web tier or the persistence tier
- available for server-side apps and also client-side JavaFX/Swing apps
Spring and validation
- Spring version 4 and higher supports Beans Validation API
- Preferred method for validation when building Spring apps
- Simply add Validation JARs to our project
Validation features include: required, validate length, validate numbers, validate with regular expressions, custom validation
我们使用的Validation JAR是Hibernate Team开发的。https://hibernate.org/validator/
Validate Required Fields
开发流程:
- Add validation rule to Customer class
Customer.java
1 | package com.luv2code.springdemo.mvc; |
- Display error messages on HTML form
customer-form.jsp
1 | <%@ page language="java" contentType="text/html; charset=UTF-8" |
- Perform validation in the Controller class
ConstomerContoller.java
1 | package com.luv2code.springdemo.mvc; |
@Valid注解可以判断Validation是否符合并可以在后面跟一个BindingResult参数。
- Update confirmation page
cutomer-confirmation.jsp
1 | <%@ page language="java" contentType="text/html; charset=UTF-8" |
现在还有一个问题是如果我们的lastName是whitespaces时,我们的validation不能检测到。
我们采用的方法是使用@InitBinder,它的作用是pre-process each web request to our controller.
1 | // add an initbinder |
StringTrimmerEditor类会帮我们去掉leading和trailing whitespace,去掉以后还会检查输入是不是长度为零,为零的话会将其变为null。
Validate Number Range
开发流程:
- Add validation rule to Customer class
Customer.java
1 |
|
- Display error messages on HTML form
customer-form.jsp
1 | Free Passes: <form:input path="freePasses" /> |
- Perform validation in the Controller class
这一步不用改了,就是@Valid注解 - Update confirmation page
如果我们还想要freePasses非空,那么我们可以加入@notNull注解,但是错误信息显示int是不能处理not null的,所以我们将其转换为Integer。但这个时候我们如果再输入一大堆String,错误信息会是”不能将String转为Integer”。
我们的解决办法是加入custom error message。(https://www.udemy.com/course/spring-hibernate-tutorial/learn/lecture/6747542#questions)
Validation with regular expression
开发流程:
- Add validation rule to Customer class
Customer.java
1 |
|
- Display error messages on HTML form
customer-form.jsp
1 | Postal Code: <form:input path="postalCode" /> |
- Perform validation in the Controller class
这一步不用改了,就是@Valid注解和BindingReasult - Update confirmation page
Custom Validation(A Custom Annotation)
为我们的coursecode定制一个validation:前缀必须为luv
开发流程
- Create custom validation rule
- Create @CourceCode annotation
1
2
3
4
5
6
7
8
9
10
11
12
13
14
15
16
17
18
19
20
21
22
23
24package com.luv2code.springdemo.mvc.validation;
import java.lang.annotation.ElementType;
import java.lang.annotation.Retention;
import java.lang.annotation.RetentionPolicy;
import java.lang.annotation.Target;
import javax.validation.Constraint;
import javax.validation.Payload;
//helper class that contains business rules/validation logic
//can apply our annotation to a method or field
//Retain this annotation in the Java class file. Process it at runtime
public CourceCode {
//define default course code
public String value() default "LUV";
//define default error message
public String message() default "Must start with LUV";
//define default groups
public Class<?>[] groups() default {};
//define default payload
public Class<? extends Payload>[] payload() default {};
}- Create CourseCodeConstraintValidator
1
2
3
4
5
6
7
8
9
10
11
12
13
14
15
16
17
18
19
20
21
22
23
24
25
26
27
28package com.luv2code.springdemo.mvc.validation;
import javax.validation.ConstraintValidator;
import javax.validation.ConstraintValidatorContext;
public class CourseCodeConstrainValidator implements ConstraintValidator<CourseCode, String>{
private String coursePrefix;
public void initialize(CourseCode theCourseCode) {
coursePrefix = theCourseCode.value();
}
public boolean isValid(String theCode, ConstraintValidatorContext constraintValidatorContext) {
boolean result;
if(theCode!=null) {
result = theCode.startsWith(coursePrefix);
}
else {
result = true;
}
return result;
}
} - Add validation rule to Customer Class
Customer.java
1 |
|
- Display error messages on HTML form
customer-form.jsp
1 | Course Code: <form:input path="courseCode" /> |
- Update confirmation page
Bonus: Deploying your App to Tomcat as a Web Application Archive (WAR) file**
When you deploy your Java web apps, you can make use of a Web Application Archive (WAR) file.
The Web Application Archive (WAR) file is a compressed version of your web application. It uses the zip file format but the file has the .war extension.
If you are using Eclipse, then the best way to visualize it is think of your “WebContent” directory being compressed as a zip file with the .war extension.
This includes all of your web pages, images, css etc. It also includes the WEB-INF directory which includes your classes in WEB-INF/classes and supporting JAR files in WEB-INF/lib.
The WAR file format is part of the Java EE / Servlet specification. As a result, all Java EE servers support this format (ie jboss, weblogic, websphere, glassfish and tomcat).
Below, I provide steps on how to create a WAR file in Eclipse. I also show how to deploy the WAR file on Tomcat.
In Eclipse, stop Tomcat
Right-click your project and select Export > WAR File
In the Destination field, enter:
/mycoolapp.war Outside of Eclipse, start Tomcat
- If you are using MS Windows, then you should find it on the Start menu
Make sure Tomcat is up and running by visiting: http://localhost:8080
Deploy your new WAR file by copying it to
\webapps
Give it about 10-15 seconds to make the deployment. You’ll know the deployment is over because you’ll see a new folder created in webapps … with your WAR file name.
- Visit your new app. If your war file was: mycoolapp.war then you can access it with: http://localhost:8080/mycoolapp/
Hibernate
Hibernate is a framework for persisting/saving Java Objects in a database.
Benefits of Hibernate: 1. Hibernate handles all of the low-level SQL 2. Minimizes the amount of JDBC code you have to develop 3.Hibernate provides the Object-to-Relational Mapping(ORM)
JDBC(Java Database Connection)是Java web程序连接数据库的时候使用的库文件,但是它的问题是需要手动写SQL语句。Hibernate是建立在JDBC上的ORM框架,本质上还是使用JDBC,只不过帮我们做好了封装。
开发Hibernate需要的其他库:1.JDK 2.Database Server(MySQL) 3.Hibernate JAR files and JDBC driver.
Configuration
- Add Hibernate Configuration file
hibernate.cfg.xml
1 |
|
- Annotate Java Class
- Map class to database
- Map fields to database columns
1 | package com.luv2code.hibernate.demo.entity; |
Why we are using JPA Annotation instead of Hibernate ?
For example, why we are not using this org.hibernate.annotations.Entity?
ANSWER:
JPA is a standard specification. Hibernate is an implementation of the JPA specification.
Hibernate implements all of the JPA annotations.
The Hibernate team recommends the use of JPA annotations as a best practice.
Hibernate CRUD
Two Key Players:
- SessionFactory
- Reads the hibernate config file
- Creates Session objects
- Heavy-weight object
- Only create once in your app
- Session
- Wraps a JDBC connection
- Main object used to save/retrieve objects
- Short-lived object
- Retrieve from session-factory
Create Object
1 | package com.luv2code.hibernate.demo; |
Read ObjectsStudent myStudent = session.get(Student.class, newStudent.getId());
Query Objects
Hibernate使用HQL进行query,其实就是SQL。
1 | package com.luv2code.hibernate.demo; |
Update Objects
1 | package com.luv2code.hibernate.demo; |
Delete Objects
1 | package com.luv2code.hibernate.demo; |
SpringMVC + Hibernate
Configuration
- Define database datasource/connection pool
- Setup Hibernate session factory
- Setup Hibernate transaction manager
- Enable configuration of transactional annotations
1
2
3
4
5
6
7
8
9
10
11
12
13
14
15
16
17
18
19
20
21
22
23
24
25
26
27
28
29
30
31
32
33
34
35
36
37
38
39
40
41
42
43
44
45
46
47
48
49
50
51
52
53
54
55
56
57
58
59
60
61
62
63
64
65
66
<beans xmlns="http://www.springframework.org/schema/beans"
xmlns:xsi="http://www.w3.org/2001/XMLSchema-instance"
xmlns:context="http://www.springframework.org/schema/context"
xmlns:tx="http://www.springframework.org/schema/tx"
xmlns:mvc="http://www.springframework.org/schema/mvc"
xsi:schemaLocation="
http://www.springframework.org/schema/beans
http://www.springframework.org/schema/beans/spring-beans.xsd
http://www.springframework.org/schema/context
http://www.springframework.org/schema/context/spring-context.xsd
http://www.springframework.org/schema/mvc
http://www.springframework.org/schema/mvc/spring-mvc.xsd
http://www.springframework.org/schema/tx
http://www.springframework.org/schema/tx/spring-tx.xsd">
<!-- Add support for component scanning -->
<context:component-scan base-package="com.luv2code.springdemo" />
<!-- Add support for conversion, formatting and validation support -->
<mvc:annotation-driven/>
<!-- Define Spring MVC view resolver -->
<bean
class="org.springframework.web.servlet.view.InternalResourceViewResolver">
<property name="prefix" value="/WEB-INF/view/" />
<property name="suffix" value=".jsp" />
</bean>
<!-- Step 1: Define Database DataSource / connection pool -->
<bean id="myDataSource" class="com.mchange.v2.c3p0.ComboPooledDataSource"
destroy-method="close">
<property name="driverClass" value="com.mysql.cj.jdbc.Driver" />
<property name="jdbcUrl" value="jdbc:mysql://localhost:3306/web_customer_tracker?useSSL=false&serverTimezone=UTC" />
<property name="user" value="springstudent" />
<property name="password" value="springstudent" />
<!-- these are connection pool properties for C3P0 -->
<property name="minPoolSize" value="5" />
<property name="maxPoolSize" value="20" />
<property name="maxIdleTime" value="30000" />
</bean>
<!-- Step 2: Setup Hibernate session factory -->
<bean id="sessionFactory"
class="org.springframework.orm.hibernate5.LocalSessionFactoryBean">
<property name="dataSource" ref="myDataSource" />
<property name="packagesToScan" value="com.luv2code.springdemo.entity" />
<property name="hibernateProperties">
<props>
<prop key="hibernate.dialect">org.hibernate.dialect.MySQLDialect</prop>
<prop key="hibernate.show_sql">true</prop>
</props>
</property>
</bean>
<!-- Step 3: Setup Hibernate transaction manager -->
<bean id="myTransactionManager"
class="org.springframework.orm.hibernate5.HibernateTransactionManager">
<property name="sessionFactory" ref="sessionFactory"/>
</bean>
<!-- Step 4: Enable configuration of transactional behavior based on annotations -->
<tx:annotation-driven transaction-manager="myTransactionManager" />
</beans>
DAO
Data Access Object:
- Responsible for interfacing with the database
- This is a common design pattern: DAO
由于我们已经xml中设置了<property name="packagesToScan" value="com.luv2code.springdemo.entity" />,所以我们不需要像在普通的Hibernate项目中那样手动说明Entity Class(Java中与数据库一一对应的类叫做Entity Class): SessionFactory factory = new Configuration().configure("hibernate.cfg.xml").addAnnotatedClass(Student.class).buildSessionFactory();。Spring会自动去扫描@Entity。
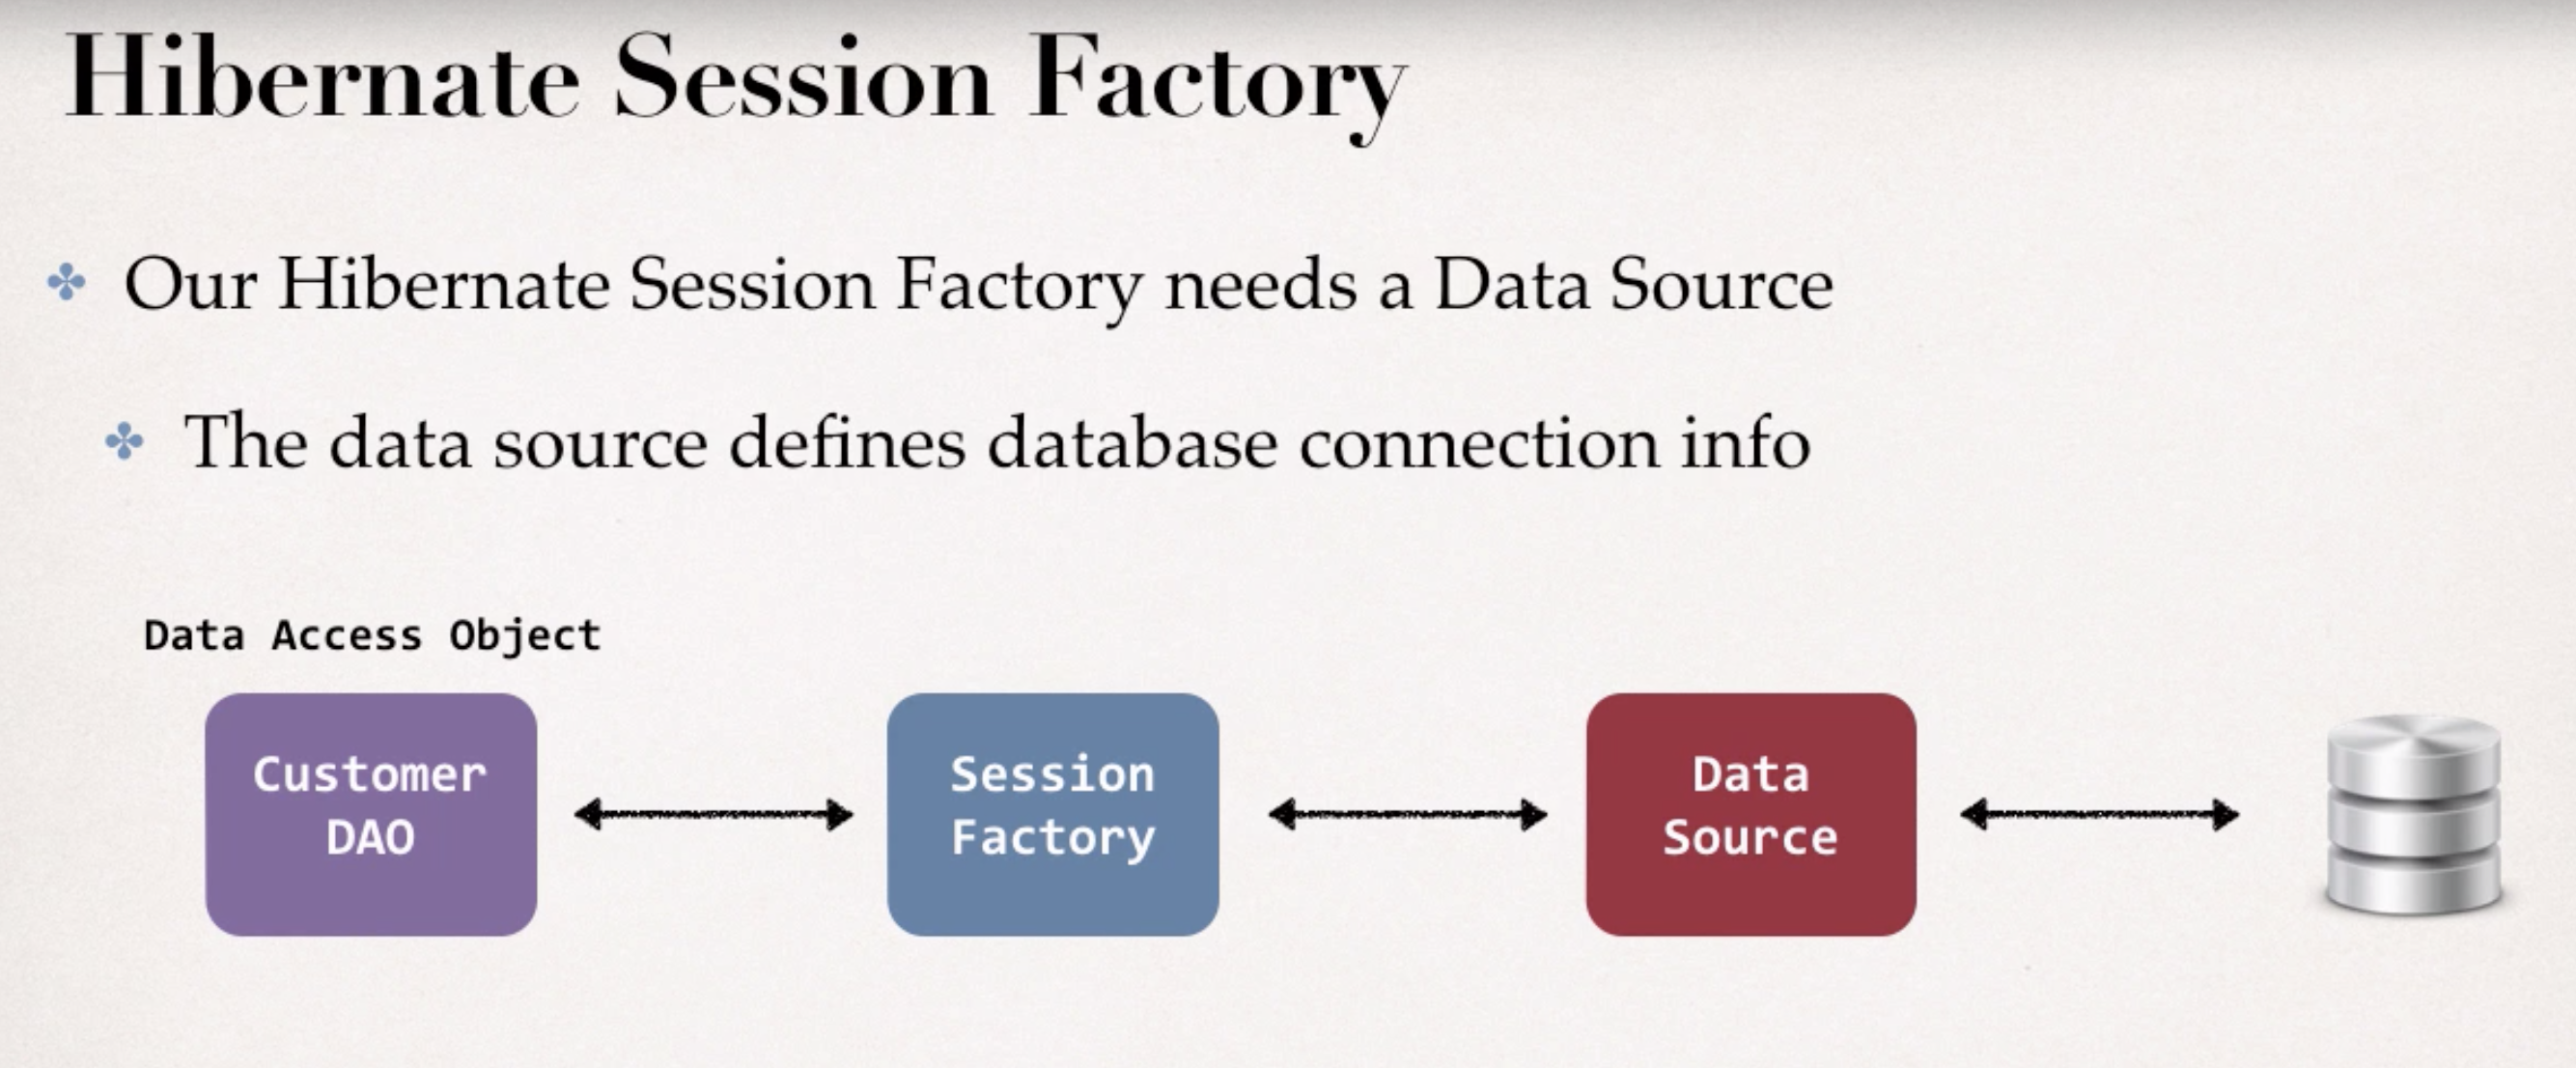
DAO层需要SessionFactory,SessionFactory需要DataSource,这俩都是dependency,我们可以使用依赖注入。DataSource已经被自动注入好了,我们xml配置中有<property name="dataSource" ref="myDataSource" />,这是setter injection,所以如果我们去看org.springframework.orm.hibernate5.LocalSessionFactoryBean的源码的话就会发现它实现了setter injection。https://github.com/spring-projects/spring-framework/blob/master/spring-orm/src/main/java/org/springframework/orm/hibernate5/LocalSessionFactoryBean.java
接下来需要做的就是:
1.Define DAO interface
CustomerDAO.java
1 | package com.luv2code.springdemo.dao; |
- Define DAO implementation(inject the session factory)
Spring @Transactional: Automatically begin and end a trasaction for your Hibernate code, no need for you to explicitly do this in your code.(The Spring magic happens behind the scenes)
Spring @Repository: 我们之前已经见过@Controller,这里我们的DAO implementation需要使用@Repository。It will automatically register DAO implementation(Component auto-scanning) and also provide translation of any JDBC related exceptions.
CustomerDAOImpl
1 | package com.luv2code.springdemo.dao; |
- Inject DAO into Controller
CustomerController.java
1 | package com.luv2code.springdemo.controller; |
Adding CSS
开发流程:
- Place CSS in a “resourses” directory
- Configure Spring to serve up “resources” directory
spring-mvc-crud-demo-servlet.xml
1 | <!-- Add support for reading web resources : css, images, js, etc --> |
这里mapping="/resources/**"中的**的意思是recursively的去subfolder里寻找资源文件。
3. Reference CSS in your JSP
1 | <link type="text/css" rel="stylesheet" href="${pageContext.request.contextPath}/resources/css/style.css" /> |
Refactor: Add a service layer
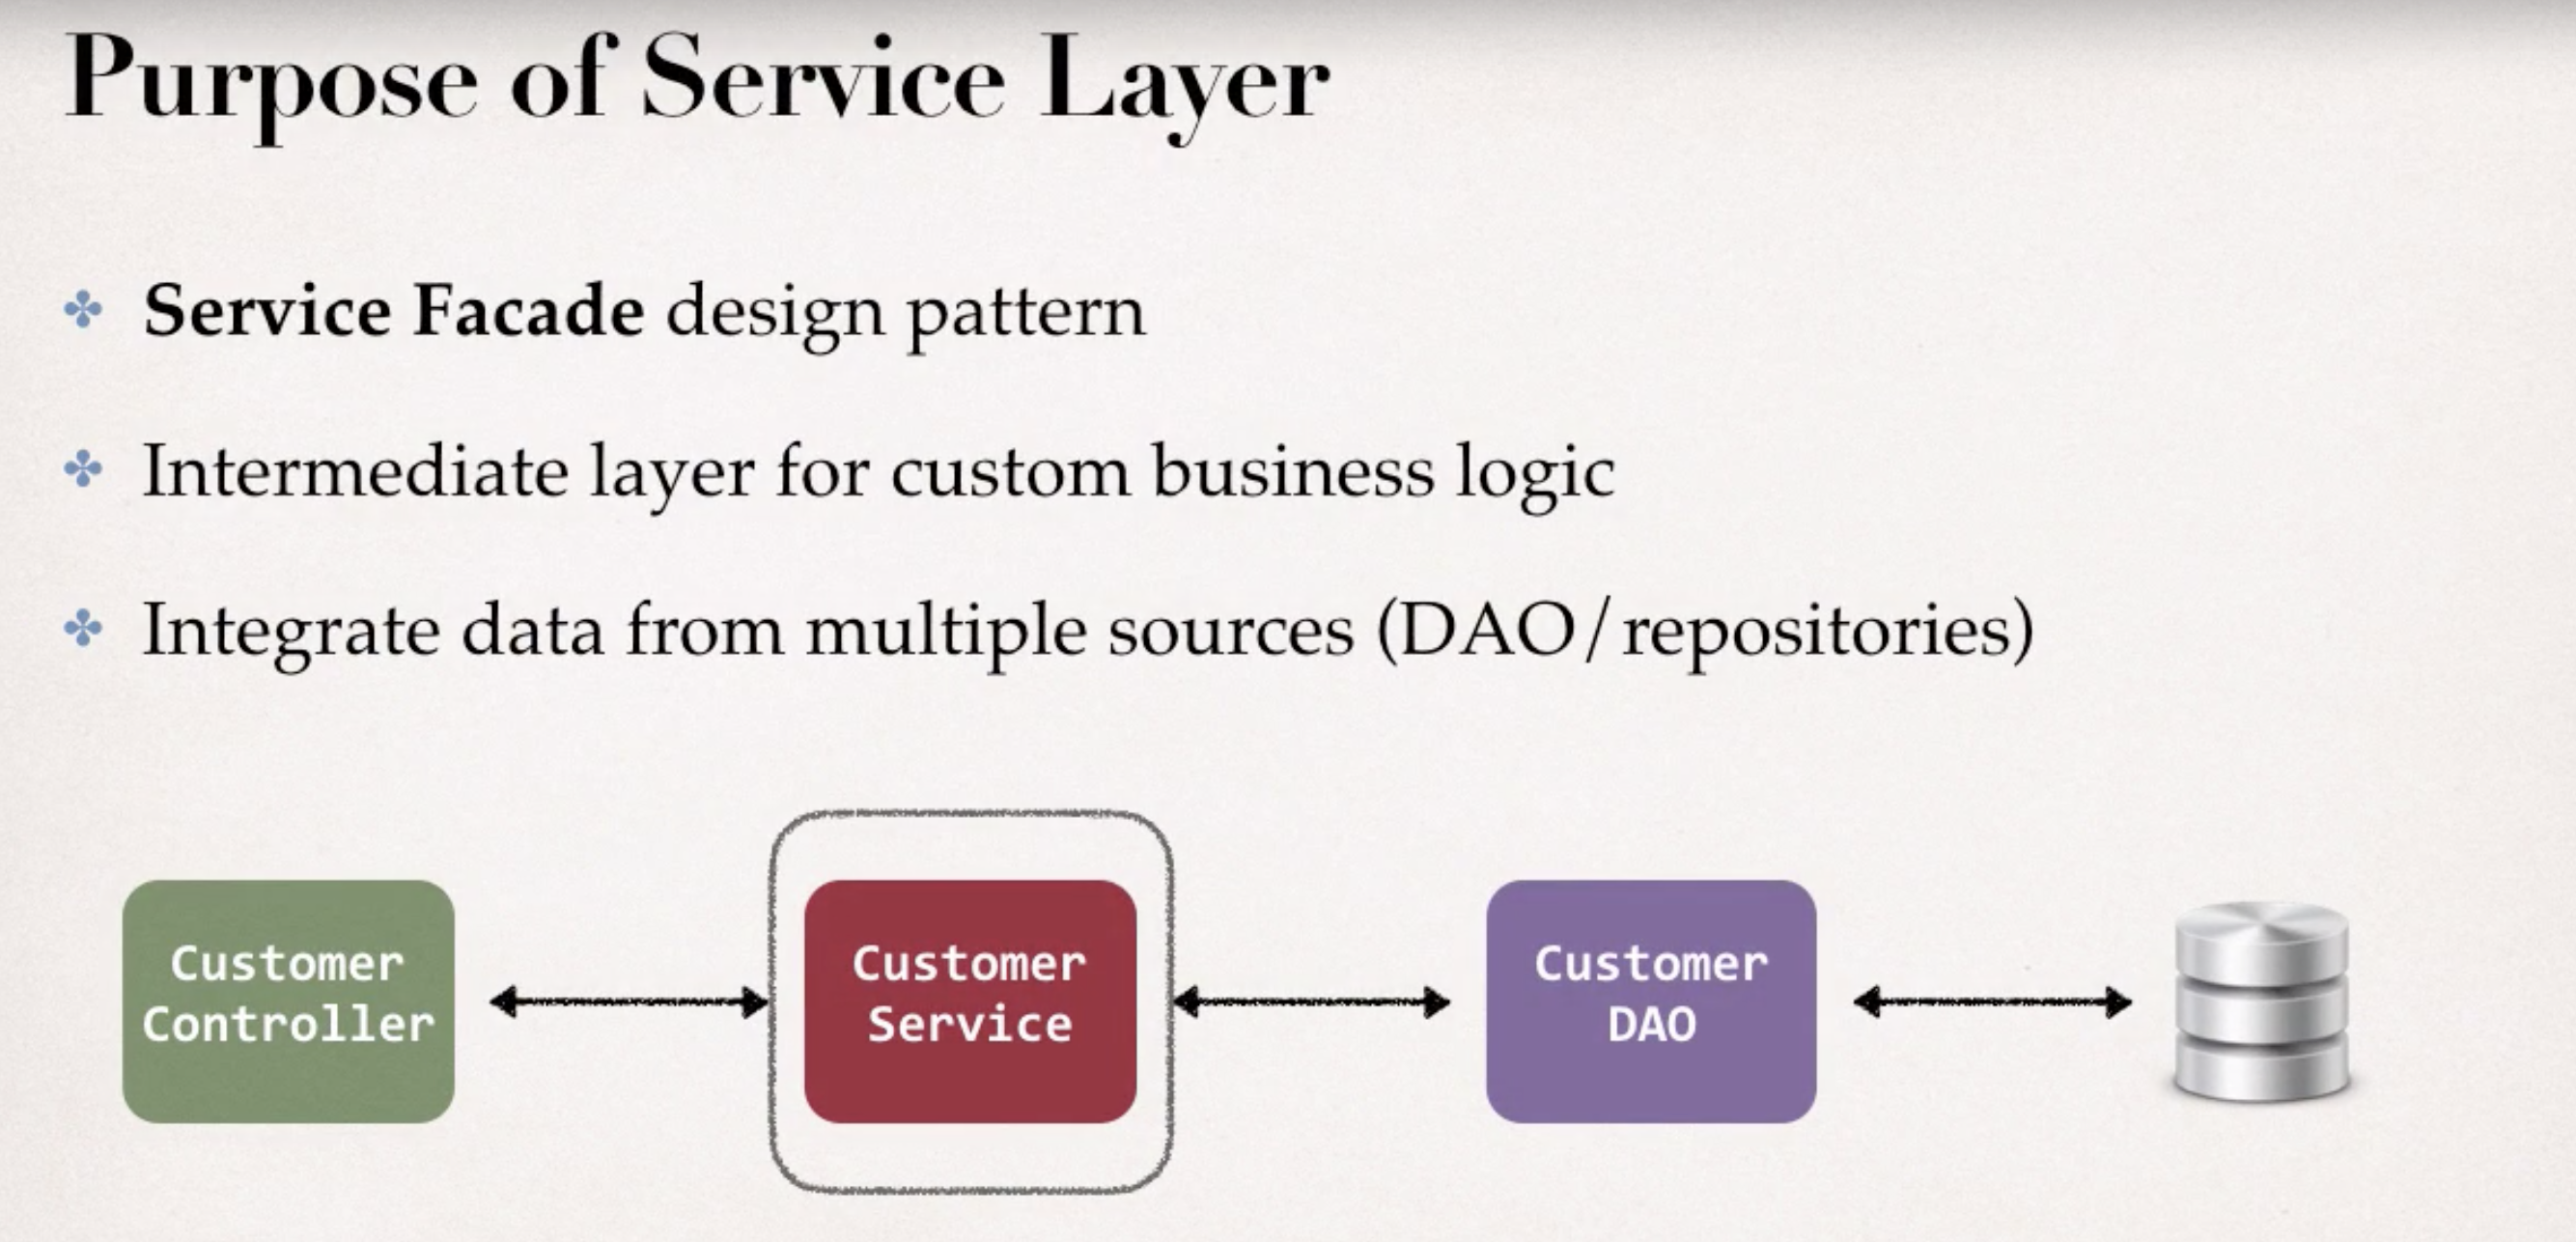
Purpose of Service Layer
- Service Facade design pattern
- Intermediate layer for customer business logic
- Integrate data from mutiple sources(DAO/repositories)
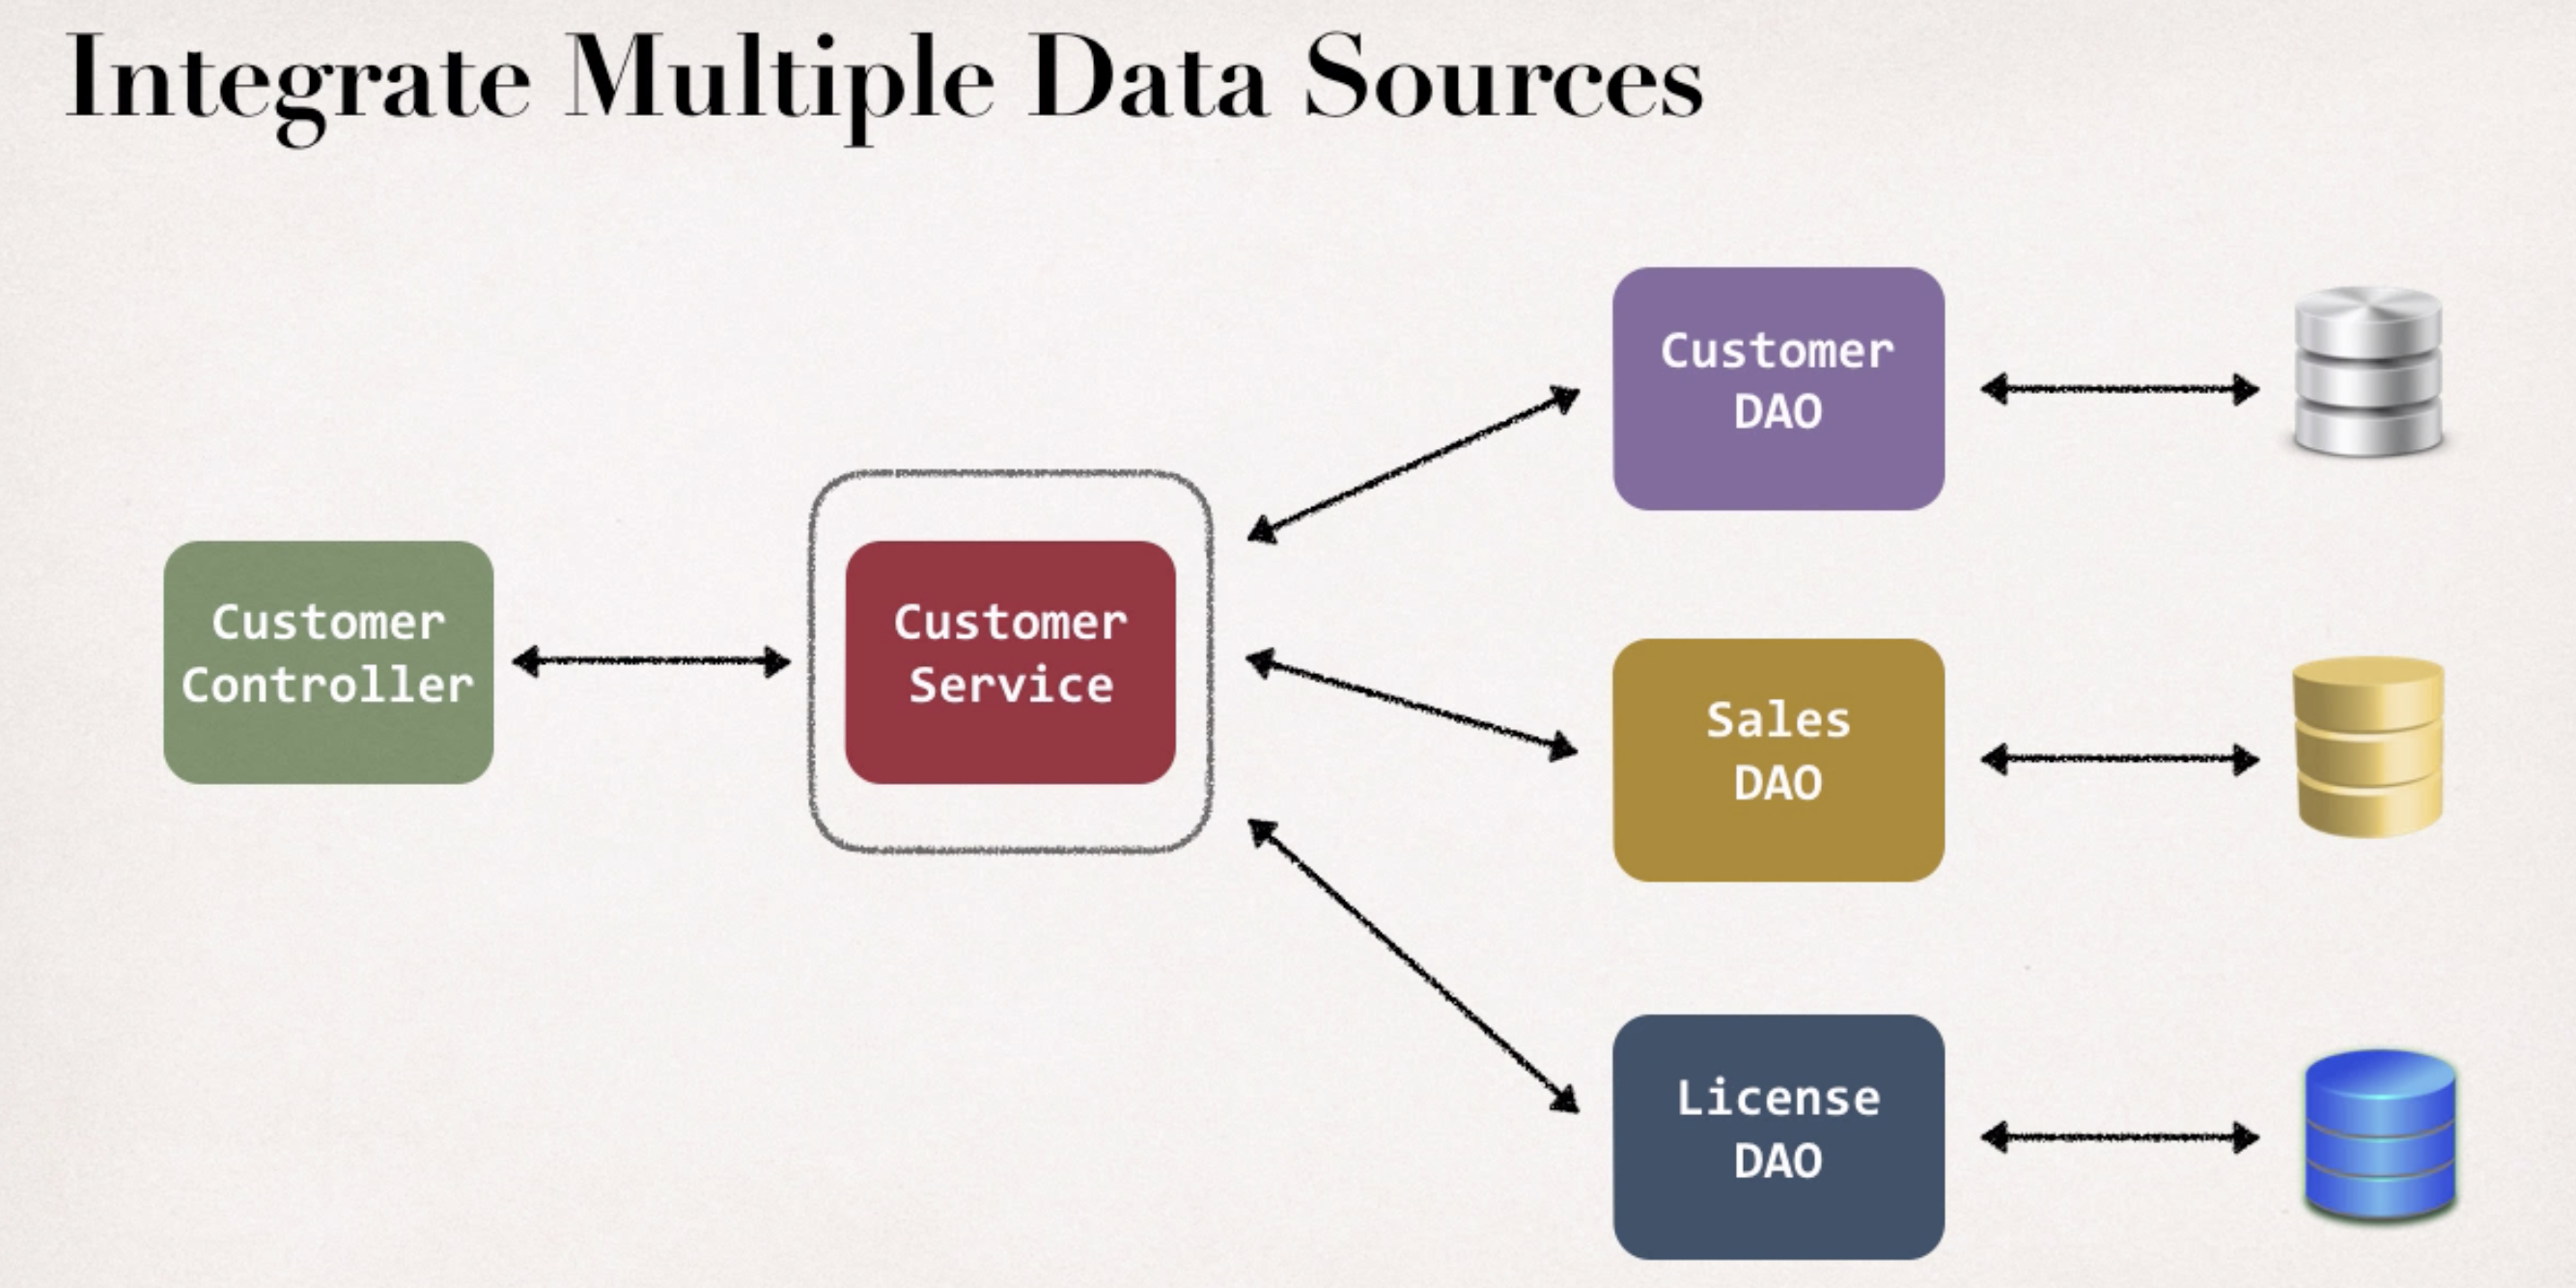
我们已经使用过@Controller和@Repository,分别用于Controller层和DAO层。Service我们使用的是@Service。这三个Annotation都继承与@Component,所以也都会被自动扫描。
开发流程:
- Define Service interface
- Define Service implementation:这里我们要把DAO注入到Service层,再把Service层注入到Controller层。同时我们把@Transational注解改到Service层去。
CustomerServiceImpl.java
1 | package com.luv2code.springdemo.service; |
CustomerDAOImpl
1 | package com.luv2code.springdemo.dao; |
所以总结一下,Controller层负责接收浏览器的GET/POST请求,DAO层负责与数据库交互获取数据,Service层负责处理从DAO层拿到的数据,处理结束后传回Controller层。