Angular学习笔记
Angular笔记
Basics
Angular的Component可以反复使用也可以使用在其他Component中, Angular有一个根Component叫做
<app-root></app-root>,其他我们生成的Component都需要在该Component内部可以手动生成Component,**但不要忘记在app.modules.ts的declarations中声明(类似于spring中对Component的scan)**;也可以用ng generate component
<name>自动生成,则不再需要手动添加声明(确保ng serve在运行)。
- @Component指明了该组件的配置情况,其中templateUrl指定了该组件的内容(可以不用templateUrl而是使用template,那么此时是在typescript文件中直接写html),styleUrls和styles起着相同的作用,唯一的区别是style可以有多个css文件。selector很像css的selector,不止可以做为选中元素,也可以做为选中属性( [
<attribute>] )或者选中class ( [.<class>] )1
2
3
4
5
6
7
8
9
10
11
12
13
14import { Component, OnInit } from '@angular/core';
@Component({
selector: 'app-servers',
templateUrl: './servers.component.html',
styleUrls: ['./servers.component.css']
})
export class ServersComponent implements OnInit {
constructor() { }
ngOnInit() {
}
} - Angular databinding的四种方式
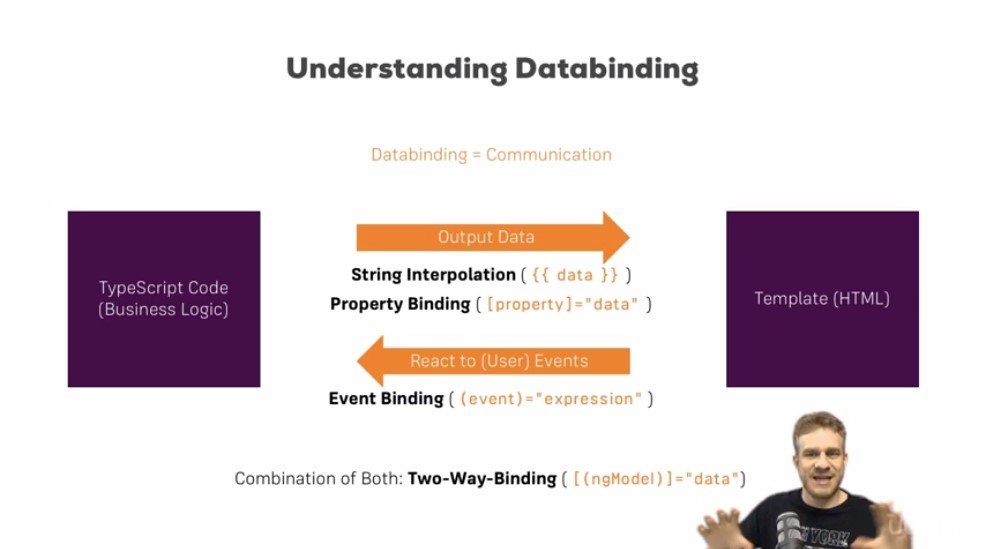
1. String Interpolation:{{ }}写在html文件中,{{ }}中间可以是typescript中声明的变量或函数,只要{{ }}中间最后是一个String类型即可。
2. Property Binding:改变某个元素的原生属性的值,比如将某个元素的disabled属性绑定到某个布尔变量上。
<button class="btn btn-primary" [disabled]="!allowNewServer"></button>
3. Event Binding:当触发绑定的event(比如click event)后,会执行expression。一个很重要的预留关键词是$event,这个关键词代表的是触发该event产生的数据。比如我们可以监听input元素的input event,每当我们改变input元素的内容的时候,我们都可以拿到这个值。<input class="form-control" (input)="onUpdataServerName($event)">
4. Two Way Binding:typescript中变量的改变会改变template上的显示,template上的显示被手动改变也会改变typescript中变量的值。需要加入FormModule这个库。
- Directives:组件是一个带模板的指令;@Component装饰器实际上就是一个@Directive装饰器,只是扩展了一些面向模板的特性。
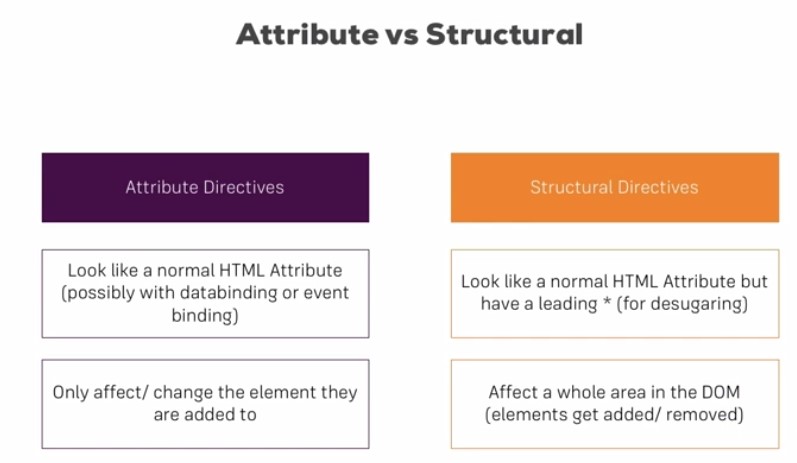
一些angular内置的directives:带*号的是structural directives,structural directives会导致元素的增加或删除,普通的attribute directives不会造成元素的增加或删除,只会改变元素。
*ngIf:如果判断为真,那么元素存在,如果判断为假,那么该元素不存在(注意与disabled属性的区别,disabled是指元素存在但不可见)。<p *ngIf="getServerStatus()"></p>
[ngStyle]:attribute directive,他本身是一个directive,我们使用的时候用Property Binding来动态的改变某个元素的style。<p [ngStyle]="{ backgroundColor: getColor() }"></p>
语法格式是:冒号前面是style名字,冒号后面是一个String,代表该style的属性。
[ngClass]:动态增加css class。<p [ngClass]="{ Online: getServerStatus==='online' } "></p>
语法格式是:冒号前面是我们css文件中的某个class,冒号后面是boolean值,可以是表达式或函数,如果boolean为真,那么在该元素上增加该class。
*ngFor:<p *ngFor="let server of servers; let i = index">{{ server }}</p>
servers是我们定义的一个javascript array。index是ngFor预留的关键词,可以获取ngFor循环的index。i可以在这个元素中当做变量使用。
一个很重要的问题:两个Component之间如何进行数据的交互。
Custom Properties & Events:
Native Properties & Events指的是对已有元素的property进行绑定,比如disabled属性。
Custom Properties & Events for Directives指的是类似*ngFor。
Custom Properties & Event for Components 用于Component间的数据交互。父Component传入子Component
1
2
3
4
5
6
7
8
9
10
11export class ServerElementComponent implements OnInit {
@Input('srvElement')
element : {
type: string,
name: string,
content: string
}
constructor() { }
ngOnInit() {
}
}使用了input注解之后,我们再使用ServerElementComponent的时候就像之前我们使用disabled属性一样使用element属性了,所以也可以为其绑定数据。
<app-server-element *ngFor="let serverElement of serverElements" [srvElement]='serverElement'></app-server-element>
@Input(alias),如果我们想为property起一个别名,乐意在里面加一个alias,这时候使用的时候就必须要用这个alias。如果不加alias,那么使用的时候就是用他本来的名字(element)。子Component发射event,父Component接受event(子Component向父Component传数据)
app.html.<app-cockpit (serverCreated)="onServerAdded($event)" (blueprintCreated)="onBlueprintAdded($event)"></app-cockpit>app.ts
1
2
3
4
5
6
7
8
9
10
11
12
13
14
15
16
17
18
19export class AppComponent {
serverElements = [{type:'server', name:'test', content:'test'}];
onServerAdded(serverData:{serverName: string, serverContent:string}) {
this.serverElements.push({
type: 'server',
name: serverData.serverName,
content: serverData.serverContent
});
}
onBlueprintAdded(serverData:{serverName: string, serverContent:string}) {
this.serverElements.push({
type: 'blueprint',
name: serverData.serverName,
content: serverData.newServerContent
});
}
}cockpit.html
1
2
3
4
5
6
7
8
9
10
11
12
13
14
15
16<div class="row">
<div class="col-xs-12">
<p>Add new Servers or blueprints!</p>
<label>Server Name</label>
<input type="text" class="form-control" [(ngModel)]="newServerName">
<label>Server Content</label>
<input type="text" class="form-control" [(ngModel)]="newServerContent">
<br>
<button
class="btn btn-primary"
(click)="onAddServer()">Add Server</button>
<button
class="btn btn-primary"
(click)="onAddBlueprint()">Add Server Blueprint</button>
</div>
</div>cockpit.ts
1
2
3
4
5
6
7
8
9
10
11
12
13
14
15
16
17
18
19
20
21
22
23
24export class CockpitComponent implements OnInit {
@Output() serverCreated = new EventEmitter<{serverName:string, serverContent:string}>();
@Output() blueprintCreated = new EventEmitter<{serverName:string, serverContent:string}>();
newServerName = '';
newServerContent = '';
constructor() { }
ngOnInit() {
}
onAddServer() {
//当我们接受到click信号的时候,触发这个函数,在这个函数中将serverCreated信号发射,这样我们的app-component会接受到serverCreated信号并把新加入的server加入数组。
this.serverCreated.emit({
serverName:this.newServerName,
serverContent:this.newServerContent
});
}
onAddBlueprint() {
this.blueprintCreated.emit({
serverName:this.newServerName,
serverContent:this.newServerContent
});
}
View Encapsulation
默认是emulated,可选的有none和native。emulated意思是css文件只对该Component起作用。传数据的其他方式
Local Reference
我们现在使用双向绑定获取input的值,我们也可以在html元素中加入#reference_name,然后我们可以在html的其他位置引用该元素。
@ViewChild
在html使用#号标识引用,然后再ts文件中使用viewchild声明一个变量。@ViewChild('nameInput', {static: false}) nameInputRef:ElementRef
后面我们就可以使用这个变量,并且它的值与html关联。this.nameInputRef.nativeElement.value
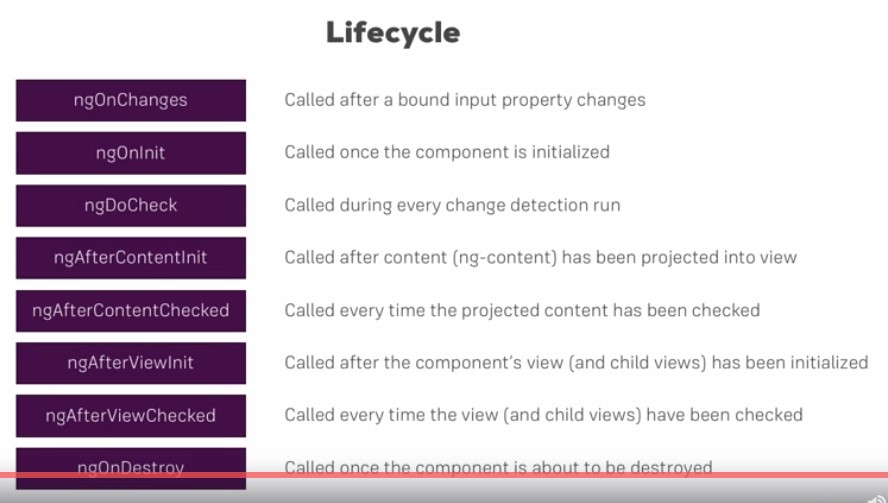
ng-contentLifecycle
More of directive
basic attribute directive :
1
2
3
4
5
6
7
8
9
10
11
12import { Directive, ElementRef, OnInit } from '@angular/core';
@Directive({
selector:'[appBasicHightlight]'
})
export class BasicHighlightDirective implements OnInit {
constructor(private elementRef:ElementRef){}
ngOnInit(): void {
this.elementRef.nativeElement.style.backgroundColor = 'green';
}
}better attribute directive:
因为有的时候不能直接操作DOM,所以这是一个更好的方法。1
2
3
4
5
6
7
8
9
10
11
12
13import { Directive, Renderer2, OnInit, ElementRef } from '@angular/core';
@Directive({
selector: '[appBetterHighlight]'
})
export class BetterHighlightDirective implements OnInit{
constructor(private elRef:ElementRef, private renderer:Renderer2) { }
ngOnInit(){
this.renderer.setStyle(this.elRef.nativeElement, 'background-color', 'blue')
}
}responsive attribute directive:使用HostListener注解可以像jQuery一样接收到event。
1
2
3
4
5
6
7@HostListener('mouseenter') mouseover(eventData:Event){
this.renderer.setStyle(this.elRef.nativeElement, 'back-ground-color', 'blue');
}
@HostListener('mouseleave') mouseleave(eventData:Event){
this.renderer.setStyle(this.elRef.nativeElement, 'back-ground-color', 'transparent');
}以上这种responsive attribute directive还是有些麻烦,我们可以不使用renderer2而是使用@HostBinding
1
2
3
4
5
6
7
8
9
10
11
12
13
14
15
16
17export class BetterHighlightDirective implements OnInit{
@HostBinding('style.backgroundColor') backgroundColor:string = 'transparent';
constructor(private elRef:ElementRef, private renderer:Renderer2) { }
ngOnInit(){
}
@HostListener('mouseenter') mouseover(eventData:Event){
// this.renderer.setStyle(this.elRef.nativeElement, 'back-ground-color', 'blue');
this.backgroundColor = 'blue';
}
@HostListener('mouseleave') mouseleave(eventData:Event){
// this.renderer.setStyle(this.elRef.nativeElement, 'back-ground-color', 'transparent');
this.backgroundColor = 'green';
}
}directive也像component一样可以进行custom binding,语法格式完全一样(在directive中新建@input成员变量),然后就可以在使用directive的时候绑定值。
1
2
3
4
5
6
7
8
9
10
11
12
13
14
15
16
17
18
19
20
21
22
23@Directive({
selector: '[appBetterHighlight]'
})
export class BetterHighlightDirective implements OnInit{
@Input() defaultColor:string = 'transparent';
@Input() changedColor:string = 'blue';
@HostBinding('style.backgroundColor') backgroundColor:string;
constructor(private elRef:ElementRef, private renderer:Renderer2) { }
ngOnInit(){
this.backgroundColor = this.defaultColor;
}
@HostListener('mouseenter') mouseover(eventData:Event){
// this.renderer.setStyle(this.elRef.nativeElement, 'back-ground-color', 'blue');
this.backgroundColor = this.changedColor;
}
@HostListener('mouseleave') mouseleave(eventData:Event){
// this.renderer.setStyle(this.elRef.nativeElement, 'back-ground-color', 'transparent');
this.backgroundColor = this.defaultColor;
}
}1
2
3
4
5<ul class="list-group">
<li class="list-group-item" appBetterHighlight [changedColor]="'red'" [defaultColor]="'pink'">
content
</li>
</ul>structural directive:
Angular本身没有符号,符号其实是告诉Angular将*ngIf变成<ng-template [ngIf]></ng-template>
Service and Dependency Injection
与spring boot的dependency injection相同,angular也采用了相同的思想,所以对于我们的服务类,我们不需要去实例化他们,而是应该在需要使用该依赖的时候使用依赖注入。
1
2
3
4
5
6
7
8
9
10
11
12
13
14
15
16
17
18
19import { Component, EventEmitter, Output } from '@angular/core';
import { LoggingService } from '../logging.service';
@Component({
selector: 'app-new-account',
templateUrl: './new-account.component.html',
styleUrls: ['./new-account.component.css'],
providers: [LoggingService]
})
export class NewAccountComponent {
@Output() accountAdded = new EventEmitter<{name: string, status: string}>();
constructor(private loggingService:LoggingService){}
onCreateAccount(accountName: string, accountStatus: string) {
this.accountAdded.emit({
name: accountName,
status: accountStatus
});
this.loggingService.logStatusChange(accountStatus);
}
}Hierarchical Injector
如果在一个component中使用了依赖注入,那么这个component及它的子component都会共享同一个相同的实例。所以如果在父component和它的子component中都对同一个service进行依赖注入,那么会产生两个实例。
所以,如果想要在子component使用父component的实例,那么不要在providers中填写service类!
如果想在一个一个依赖中注入另一个依赖,需要标注
@Injectable,同时在appModule的provider中注明。Injection Dependency的好处:①代码结构更清晰,分离操作与接口 ② 不再需要component之间繁琐的数据传输,数据传输都可以通过service层
Routing
- routing的基础配置
1
2
3
4
5
6
7
8
9
10
11
12
13
14
15
16
17
18
19
20
21
22
23
24
25
26
27
28
29
30
31
32
33
34
35
36
37import { BrowserModule } from '@angular/platform-browser';
import { NgModule } from '@angular/core';
import { FormsModule } from '@angular/forms';
import { AppComponent } from './app.component';
import { HomeComponent } from './home/home.component';
import { UsersComponent } from './users/users.component';
import { ServersComponent } from './servers/servers.component';
import { UserComponent } from './users/user/user.component';
import { EditServerComponent } from './servers/edit-server/edit-server.component';
import { ServerComponent } from './servers/server/server.component';
import { ServersService } from './servers/servers.service';
import { Routes, RouterModule } from '@angular/router';
const appRoutes: Routes = [
{path: 'users', component: UsersComponent},
{path: '', component: HomeComponent },
{path: 'servers', component: ServersComponent}
];
@NgModule({
declarations: [
AppComponent,
HomeComponent,
UsersComponent,
ServersComponent,
UserComponent,
EditServerComponent,
ServerComponent
],
imports: [
BrowserModule,
FormsModule,
RouterModule.forRoot(appRoutes)
],
providers: [ServersService],
bootstrap: [AppComponent]
})
export class AppModule { }
1 | <div class="row"> |
navigation:使用routerlink而不是href去进行navigation。
1
2
3<li role="presentation" class="active"><a [routerLink]="[ '/' ]">Home</a></li>
<li role="presentation"><a [routerLink]="[ '/servers' ]">Servers</a></li>
<li role="presentation"><a [routerLink]="[ '/users']">Users</a></li>绝对路径:
/<path>
相对路径:<path>,../,./route active:
routerLinkActive="active"用于该route被选中时将会添加的active类,这里的active是bootstrap自带的active类,我们也可以写自己的active样式。[routerLinkActiveOptions]="{exact: true}指明是否只在绝对路径才会active。(不加这个那么点击servers和users时home也是active)1
2
3
4
5
6
7
8
9<li role="presentation" routerLinkActive="active" [routerLinkActiveOptions]="{exact: true}">
<a [routerLink]="[ '/' ]">Home</a>
</li>
<li role="presentation" routerLinkActive="active">
<a [routerLink]="[ '/servers' ]">Servers</a>
</li>
<li role="presentation" routerLinkActive="active">
<a [routerLink]="[ '/users']">Users</a>
</li>在typescipt进行routing
1
2
3
4
5
6
7
8
9
10
11
12
13
14
15
16@Component({
selector: 'app-home',
templateUrl: './home.component.html',
styleUrls: ['./home.component.css']
})
export class HomeComponent implements OnInit {
constructor(private router:Router) { }
ngOnInit() {
}
onClickButton(){
this.router.navigate(['/servers']);
}
}typescript的navigate函数并不像html一样知道目前的路径,所以如果我们需要相对路径,需要手动添加,也可以添加目前的activeRoute。
1
2
3
4
5
6
7
8
9
10
11
12
13
14
15
16@Component({
selector: 'app-home',
templateUrl: './home.component.html',
styleUrls: ['./home.component.css']
})
export class HomeComponent implements OnInit {
constructor(private router:Router, private activedRoute:ActivatedRoute) { }
ngOnInit() {
}
onClickButton(){
this.router.navigate(['servers'],{relativeTo: this.activedRoute});
}
}url parameters
{path: 'users/:id/:name', component:UsersComponent}
在typescript中使用dynamic params:ActivatedRoute是一个javascript object,里面含有active页面的很多信息。1
2
3
4
5
6
7
8
9
10
11
12export class UserComponent implements OnInit {
user: {id: number, name: string};
constructor(private activedRouter:ActivatedRoute) { }
ngOnInit() {
this.user = {
id: this.activedRouter.snapshot.params['id'],
name: this.activedRouter.snapshot.params['name']
};
}
}
由于angular是single page application,所以它默认的行为是如果已经加载了某一route,当我们想再次进入同一route时(在一个component中再次进入该component),angular默认不进行任何动作,所以会出现我们在某一route更新值页面不变化的情况。
解决办法是使用ActivatedRouter.params这个angular预留observable来监听是否该route上有参数变化,有变化的话即发射event,我们可以监听这个event1
2
3
4<p>User with {{user.id}} loaded.</p>
<p>User name is {{user.name}}</p>
<a [routerLink]="[ '/users', 10, 'shiyu']">Go to shiyu page</a>1
2
3
4
5
6
7
8
9
10
11
12
13
14
15
16
17export class UserComponent implements OnInit {
user: {id: number, name: string};
constructor(private activedRouter:ActivatedRoute) { }
ngOnInit() {
this.user = {
id: this.activedRouter.snapshot.params['id'],
name: this.activedRouter.snapshot.params['name']
};
this.activedRouter.params.subscribe((params:Params)=>{
this.user.id = params['id'];
this.user.name = params['name'];
});
}
}这里我们不需要手动在onDestroy()的时候unsubscribe,但是如果是我们自己创建的observable,那么需要unsubscribe(后面的observable章节会讲)。
query parameters
html中使用query parameters1
2
3
4
5
6
7<a
[routerLink] = "['/servers', 5, 'edit']"
[queryParams] = "{ allowEdit: '1'}"
class="list-group-item"
*ngFor="let server of servers">
{{ server.name }}
</a>typescript中使用query parameters
1
2
3
4
5
6
7
8
9
10
11export class HomeComponent implements OnInit {
constructor(private router:Router, private activedRoute:ActivatedRoute) { }
ngOnInit() {
}
onClickButton(id:number){
this.router.navigate(['servers', id, 'edit'], {queryParams:{allowEdit: '1'}});
}
}使用的时候与url parameter类似:
1
2
3
4console.log(this.activatedRouter.snapshot.queryParams);
console.log(this.activatedRouter.snapshot.fragment);
this.activatedRouter.queryParams.subscribe();
this.activatedRouter.fragment.subscribe();child(nested) routing
如果我们想要在一个页面(route)中嵌入一个子页面(route),比如在页面上显示详细信息,而不是另起一个页面显示详细信息,这个时候我们可以使用child routing。1
2
3
4
5
6
7
8
9const appRoutes: Routes = [
{path: 'users', component: UsersComponent, children:[
{path: 'users/:id/:name', component:UserComponent}
]},
{path: '', component: HomeComponent },
{path: 'servers', component: ServersComponent, children: [
{path: 'servers/:id/edit', component : EditServerComponent},
{path: 'servers/:id',component:ServerComponent}]}
];同时在
users.component.ts和servers.component.ts的想要显示详细信息的地方加入<router-outlet></router-outlet>。
我们可以使用queryParamsHandling来保证子route保留(preserve)或融合(merge)父route的参数。
this.router.navigate(['edit'], {relativeTo:this.activitedRouter, queryParamsHandling:'preserve'});redirect and wildcard
1
2
3
4
5
6
7
8
9
10
11
12const appRoutes: Routes = [
{path: 'users', component: UsersComponent, children:[
{path: ':id/:name', component:UserComponent}
]},
{path: '', component: HomeComponent },
{path: 'servers', component: ServersComponent, children: [
{path: ':id/edit', component : EditServerComponent},
{path: ':id',component:ServerComponent}
]},
{path: 'not-found', component: NotFoundComponent},
{path: '**', redirectTo: '/not-found'}
];**必须放在最后,意思是所有为定义的route。redirect问题:
Important: Redirection Path Matching
In our example, we didn’t encounter any issues when we tried to redirect the user. But that’s not always the case when adding redirections.
By default, Angular matches paths by prefix. That means, that the following route will match both /recipes and just /
{ path: ‘’, redirectTo: ‘/somewhere-else’ }
Actually, Angular will give you an error here, because that’s a common gotcha: This route will now ALWAYS redirect you! Why?
Since the default matching strategy is “prefix” , Angular checks if the path you entered in the URL does start with the path specified in the route. Of course every path starts with ‘’ (Important: That’s no whitespace, it’s simply “nothing”).
To fix this behavior, you need to change the matching strategy to “full” :
{ path: ‘’, redirectTo: ‘/somewhere-else’, pathMatch: ‘full’ }
Now, you only get redirected, if the full path is ‘’ (so only if you got NO other content in your path in this example).route guard(144)
保护路径不被访问canActiveGuard
在用户离开页面前进行询问canDeactiveGuard
在component加载前获取一些数据Resolve。resolve allows you load data (possibly asynchronously) BEFORE the component has been loaded. ngOnInit AFTER that happened. Both is perfectly fine, depending on your app and how you want to handle the possible “waiting time”.
Observables
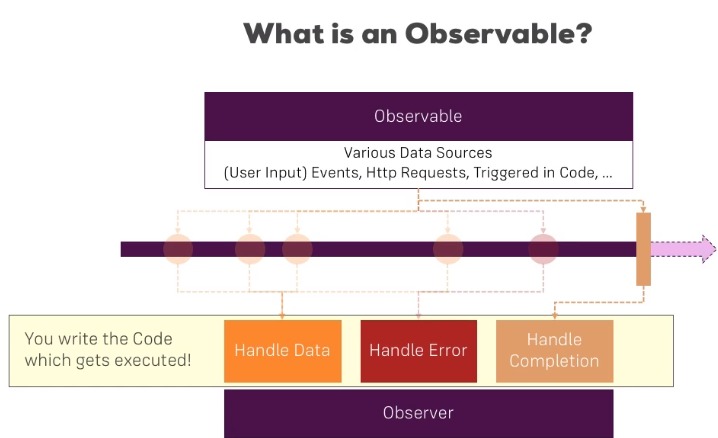
- 自己创建的observables切记要进行unsubscribe,否则会造成内存泄漏(因为observable是非同步的,所以相当于以前的进程没有杀死又开了新的进程)。
1
2
3
4
5
6
7
8
9
10
11
12
13
14export class HomeComponent implements OnInit, OnDestroy {
private firstSubscription: Subscription;
constructor() { }
ngOnInit() {
this.firstSubscription = interval(1000).subscribe((count)=>{
console.log(count);
});
}
ngOnDestroy(): void {
this.firstSubscription.unsubscribe();
}
} - custom observable
如果error在complete之前发生,那么complete就不会发生,因为error之后就不再继续发射信号了。1
2
3
4
5
6
7
8
9
10
11
12
13
14
15
16
17
18
19
20
21
22
23
24
25
26
27
28
29
30
31
32
33
34
35
36
37
38
39
40
41export class HomeComponent implements OnInit, OnDestroy {
private firstObsSubscription: Subscription;
constructor() {
}
ngOnInit() {
// this.firstObsSubscription = interval(1000).subscribe(count => {
// console.log(count);
// });
const customIntervalObservable = Observable.create(observer => {
let count = 0;
setInterval(() => {
observer.next(count);
if (count === 5) {
observer.complete();
}
if (count > 3) {
observer.error(new Error('Count is greater 3!'));
}
count++;
}, 1000);
});
this.firstObsSubscription = customIntervalObservable.subscribe(data => {
console.log(data);
}, error => {
console.log(error);
alert(error.message);
}, () => {
console.log('Completed!');
});
}
ngOnDestroy(): void {
this.firstObsSubscription.unsubscribe();
}
} - operator
observable可以使用operator对数据进行操作,类似spark。1
2
3
4
5
6
7
8
9
10
11
12this.firstObsSubscription = customIntervalObservable.pipe(filter(data => {
return data > 0;
}), map((data: number) => {
return 'Round: ' + (data + 1);
})).subscribe(data => {
console.log(data);
}, error => {
console.log(error);
alert(error.message);
}, () => {
console.log('Completed!');
}); - subject
rxjs提供一种类似于event emitter的observable,可以在observable外部手动调用next()触发,我们可以在cross component的情况中使用subject,而放弃使用event emitter。
需要注意的是在@output的component交互的时候还是需要使用event emitter。所以其实就是说我们在service中使用的event emitter换成subject为好。
user.service中声明
1
2
3
4
@Injectable({providedIn: 'root'})
export class UserService {
activatedEmitter = new Subject<boolean>();
}
user.component中触发
1
2
3
4
5
6
7
8
9
10
11
12
13
14
15
16
export class UserComponent implements OnInit {
id: number;
constructor(private route: ActivatedRoute, private userService: UserService) {
}
ngOnInit() {
this.route.params.subscribe((params: Params) => {
this.id = +params.id;
});
}
onActivate() {
this.userService.activatedEmitter.next(true);
}
}
app.component中订阅,由于subject是一种特殊的observable,所以要记得unsubscribe。
1
2
3
4
5
6
7
8
9
10
11
12
13
14
15
16
17
export class AppComponent implements OnInit, OnDestroy {
userActivated = false;
private activatedSub: Subscription;
constructor(private userService: UserService) {
}
ngOnInit() {
this.activatedSub = this.userService.activatedEmitter.subscribe(didActivate => {
this.userActivated = didActivate;
});
}
ngOnDestroy(): void {
this.activatedSub.unsubscribe();
}
}
Forms
Forms有两种形式,一种是angular自动根据写好的form html来生成相应的javascript object,一种是直接通过在typescript中写出html的form。
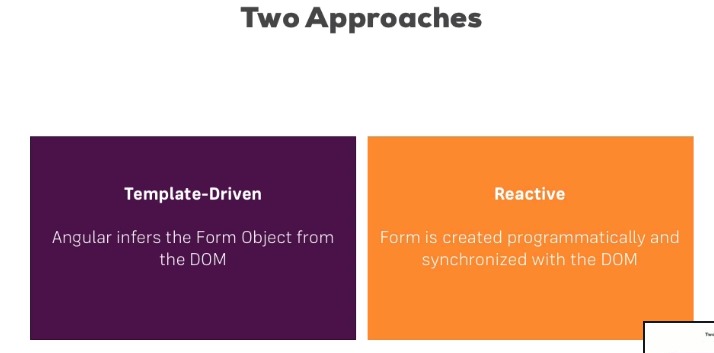
Template-Driven
在想要添加控制的html form元素上添加ngModel和name,angular即可自动识别。<input type="email" id="email" cclass="form-control" ngModel name="email">使用template-driven
使用local reference
1
2
3
4
5
6
7
8
9
10
11
12
13
14
15
16
17
18
19
20
21<form (ngSubmit)="onSubmit(f)" #f="ngForm">
<div id="user-data">
<div class="form-group">
<label for="username">Username</label>
<input type="text" id="username" class="form-control" ngModel name="username">
</div>
<button class="btn btn-default" type="button">Suggest an Username</button>
<div class="form-group">
<label for="email">Mail</label>
<input type="email" id="email" class="form-control" ngModel name="email">
</div>
</div>
<div class="form-group">
<label for="secret">Secret Questions</label>
<select id="secret" class="form-control" ngModel name="selection">
<option value="pet">Your first Pet?</option>
<option value="teacher">Your first teacher?</option>
</select>
</div>
<button class="btn btn-primary" type="submit">Submit</button>
</form>使用@viewchild(viewchild其实也是获取靠获取local reference来获取该form javascipt object),这种方式在判断form的内容是否validate的时候有用,因为是在submit前就得到了这个object。
1
2
3
4
5
6
7
8
9
10
11export class AppComponent {
@ViewChild('f', {static: false}) signupForm: NgForm;
suggestUserName() {
const suggestedName = 'Superuser';
}
onSubmit(f:NgForm){
console.log(this.signupForm);
}
}
validation
Object的格式:1
2
3
4
5
6
7
8
9
10
11
12
13
14
15
16
17
18
19
20
21
22
23
24
25
26
27
28NgForm {submitted: true, _directives: Array(3), ngSubmit: EventEmitter, form: FormGroup}
control: (...)
controls: Object
email: FormControl {validator: ƒ, asyncValidator: null, _onCollectionChange: ƒ, pristine: false, touched: true, …}
selection: FormControl {validator: null, asyncValidator: null, _onCollectionChange: ƒ, pristine: true, touched: false, …}
username: FormControl {validator: ƒ, asyncValidator: null, _onCollectionChange: ƒ, pristine: false, touched: true, …}
__proto__: Object
dirty: (...)
disabled: (...)
enabled: (...)
errors: (...)
form: FormGroup {validator: null, asyncValidator: null, _onCollectionChange: ƒ, pristine: false, touched: true, …}
formDirective: (...)
invalid: (...)
ngSubmit: EventEmitter {_isScalar: false, observers: Array(1), closed: false, isStopped: false, hasError: false, …}
path: (...)
pending: (...)
pristine: (...)
status: (...)
statusChanges: (...)
submitted: true
touched: (...)
untouched: (...)
valid: (...)
value: (...)
valueChanges: (...)
_directives: (3) [NgModel, NgModel, NgModel]
__proto__: ControlContainer我们可以发现这个form object本身有包括touched,valid,value等属性,同时它也包括controls,controls中的每个control代表单一的输入字段,他也有自身的各种属性。
我们可以使用前面得到的form object进行validation。
<button class="btn btn-primary" type="submit" [disabled]="!f.valid">Submit</button>
我们也可以直接为更小的control直接添加local reference,但是这个时候我们赋给他的种类是ngModel而不是ngForm。1
2
3
4
5<div class="form-group">
<label for="email">Mail</label>
<input type="email" id="email" class="form-control" ngModel name="email" required email #email="ngModel">
<span class="help-block" *ngIf="!email.valid&&email.touched">Please enter a valid email!</span>
</div>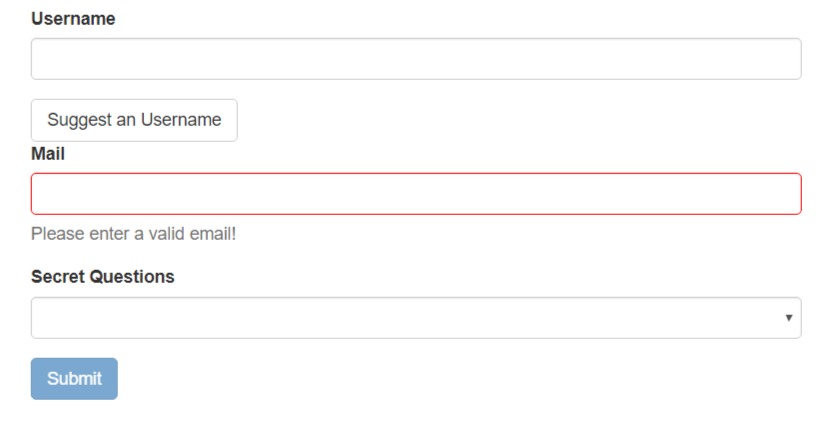
angular会为html添加生成的object的一些css类,类如ng-invalid,ng-touchded,我们可以使用这个添加一些交互效果。以下效果是用户点击后如果不是合法的输入,边框会变红。
1
2
3input.ng-invalid.ng-touched{
border: 1px solid red;
}default value
将之前的ngModel改为one way binding-property binding形式,即可以设定默认值。这是很好理解的,因为我们不想让之前对这个control的输可以更改typescript中这个value的值,所以我们不使用双向绑定而是使用单向绑定。1
2
3
4
5
6
7
8<input type="text" id="username" class="form-control" [ngModel]="'initial value'" name="username" required>
<div class="form-group">
<label for="secret">Secret Questions</label>
<select id="secret" class="form-control" [ngModel]="'pet'" name="selection">
<option value="pet">Your first Pet?</option>
<option value="teacher">Your first teacher?</option>
</select>
</div>在某些特殊的情景下,我们可能需要双向绑定,比如同步实时显示输入的值。
ngModelGroup
我们可以使用ngModelGroup将多个control放到一个javascript object中。在typescript中改变form control的值。
有两种方式,一种是直接在form上调用setValue()函数,作用是改变整个form;另一种是调用这个form的form.patchValue()函数,作用是overwrite 这个form的一部分。
reset the form: 在form上调用reset()函数,reset不止改变form的值,也会改变它的属性,比如touched、valid等。
- reactive form(我们不再需要FormsModule,而是需要ReactiveFormsModule)
在typescript中创建formGroup对象同步html from与我们在typescript中船建的formGroup的对象1
2
3
4
5signupForm = new FormGroup({
'username': new FormControl(null),
'email': new FormControl(null),
'gender': new FormControl('male')
});1
2
3
4
5
6
7
8
9
10
11
12
13
14
15
16
17
18
19
20
21
22
23
24
25
26
27
28
29
30
31
32
33<div class="container">
<div class="row">
<div class="col-xs-12 col-sm-10 col-md-8 col-sm-offset-1 col-md-offset-2">
<form [formGroup]="signupForm">
<div class="form-group">
<label for="username">Username</label>
<input
type="text"
id="username"
class="form-control"
[formControlName]="'username'">
</div>
<div class="form-group">
<label for="email">email</label>
<input
type="text"
id="email"
class="form-control"
[formControlName]="'email'">
</div>
<div class="radio" *ngFor="let gender of genders">
<label>
<input
type="radio"
[value]="gender"
[formControlName]="'gender'">{{ gender }}
</label>
</div>
<button class="btn btn-primary" type="submit">Submit</button>
</form>
</div>
</div>
</div> - reactive form validation
1
2
3
4
5
6
7
8signupForm: FormGroup;
ngOnInit(){
this.signupForm = new FormGroup({
'username': new FormControl(null, Validators.required),
'email': new FormControl(null, [Validators.required, Validators.email]),
'gender': new FormControl('male')
});
} - 从formGroup中得到formControl
我们可以使用get()函数来得到formGroup中的formControl。1
2
3
4
5
6
7
8
9<div class="form-group">
<label for="username">Username</label>
<input
type="text"
id="username"
class="form-control"
[formControlName]="'username'">
<span class="help-block" *ngIf="!signupForm.get('username').valid&&signupForm.get('username').touched">username is invalid!</span>
</div> - Nested Form Group
我们可以在formGroup中嵌套更多的formGroup,这时候在html中同步要使用FormGroupName,同时我们的get函数也要做相应的改变1
2
3
4
5
6
7
8
9
10
11
12
13
14
15
16
17export class AppComponent implements OnInit{
genders = ['male', 'female'];
signupForm: FormGroup;
ngOnInit(){
this.signupForm = new FormGroup({
'userData': new FormGroup({
'username': new FormControl(null, Validators.required),
'email': new FormControl(null, [Validators.required, Validators.email])
}),
'gender': new FormControl('male')
});
}
onSubmit(){
console.log(this.signupForm);
}
}1
2
3
4
5
6
7
8
9
10
11
12
13
14
15
16
17
18
19
20
21
22
23
24
25
26
27
28
29
30
31
32
33
34
35
36
37<div class="container">
<div class="row">
<div class="col-xs-12 col-sm-10 col-md-8 col-sm-offset-1 col-md-offset-2">
<form [formGroup]="signupForm" (ngSubmit)="onSubmit()">
<div [formGroupName]="'userData'">
<div class="form-group">
<label for="username">Username</label>
<input
type="text"
id="username"
class="form-control"
[formControlName]="'username'">
<span class="help-block" *ngIf="!signupForm.get('userData.username').valid&&signupForm.get('userData.username').touched">username is invalid!</span>
</div>
<div class="form-group">
<label for="email">email</label>
<input
type="text"
id="email"
class="form-control"
[formControlName]="'email'">
</div>
</div>
<div class="radio" *ngFor="let gender of genders">
<label>
<input
type="radio"
[value]="gender"
[formControlName]="'gender'">{{ gender }}
</label>
</div>
<button class="btn btn-primary" type="submit">Submit</button>
</form>
</div>
</div>
</div> - formArray
1
2
3
4
5
6
7<div formArrayName="hobbies">
<h4>Your Hobby</h4>
<button class="btn btn-default" type="button" (click)="onAddHobby()">Add hobby</button>
<div class="form-group" *ngFor="let hobbyControl of signupForm.get('hobbies').controls; let i = index">
<input type="text" class="form-control" [formControlName]="i">
</div>
</div>1
2
3
4
5
6
7
8
9
10
11
12
13
14
15
16
17
18
19
20
21
22export class AppComponent implements OnInit{
genders = ['male', 'female'];
signupForm: FormGroup;
ngOnInit(){
this.signupForm = new FormGroup({
'userData': new FormGroup({
'username': new FormControl(null, Validators.required),
'email': new FormControl(null, [Validators.required, Validators.email])
}),
'gender': new FormControl('male'),
'hobbies': new FormArray([])
});
}
onSubmit(){
console.log(this.signupForm);
}
onAddHobby(){
(<FormArray>this.signupForm.get("hobbies")).push(new FormControl(null, Validators.required));
}
} - custom validator
synchronized validator:我们可以使用每个control的errors属性去查看错误信息。asynchronized validator:1
2
3
4
5
6
7
8
9
10
11
12
13
14
15
16
17
18
19
20
21
22
23
24
25
26
27
28
29
30export class AppComponent implements OnInit{
genders = ['male', 'female'];
signupForm: FormGroup;
forbiddenUserNames = ['chris', 'anna'];
ngOnInit(){
this.signupForm = new FormGroup({
'userData': new FormGroup({
'username': new FormControl(null, [Validators.required, this.forbiddenNames.bind(this)]),
'email': new FormControl(null, [Validators.required, Validators.email])
}),
'gender': new FormControl('male'),
'hobbies': new FormArray([])
});
}
onSubmit(){
console.log(this.signupForm);
}
onAddHobby(){
(<FormArray>this.signupForm.get("hobbies")).push(new FormControl(null, Validators.required));
}
forbiddenNames(control:FormControl):{[s:string]:boolean}{
if(this.forbiddenUserNames.indexOf(control.value) !== -1){
return {'nameIsForbidden': true}
}
return null;
}
}1
2
3
4
5
6
7
8
9
10
11
12
13
14
15
16
17
18
19
20
21
22
23
24
25
26
27
28
29
30
31
32
33
34
35
36
37
38
39
40
41
42
43
44export class AppComponent implements OnInit{
genders = ['male', 'female'];
signupForm: FormGroup;
forbiddenUserNames = ['chris', 'anna'];
ngOnInit(){
this.signupForm = new FormGroup({
'userData': new FormGroup({
'username': new FormControl(null, [Validators.required, this.forbiddenNames.bind(this)]),
'email': new FormControl(null, [Validators.required, Validators.email], this.forbiddenEmails)
}),
'gender': new FormControl('male'),
'hobbies': new FormArray([])
});
}
onSubmit(){
console.log(this.signupForm);
}
onAddHobby(){
(<FormArray>this.signupForm.get("hobbies")).push(new FormControl(null, Validators.required));
}
forbiddenNames(control:FormControl):{[s:string]:boolean}{
if(this.forbiddenUserNames.indexOf(control.value) !== -1){
return {'nameIsForbidden': true}
}
return null;
}
forbiddenEmails(control:FormControl):Promise<any> | Observable<any> {
const promise = new Promise<any>((resolve, reject)=>{
setTimeout(()=>{
if(control.value ==='test@test.com'){
resolve({'emailIsForbidden': true});
} else {
resolve(null);
}
}, 1500);
});
return promise;
}
} - formGroup自带的两个observable
valueChanges和statusChanges。1
2
3this.signupForm.valueChanges.subscribe((value)=>{
console.log(value);
}); - 在typescript中改变form control的值
可以直接调用formGroup.setValue(),formGroup.patchValue(),formGroup.reset()
实战经验
除了之前提到过的Component之间交流的方式,我们也可以使用@ViewChild达到在父Component中操纵子Component的目的。
这个本地变量方法是个简单便利的方法。但是它也有局限性,因为父组件-子组件的连接必须全部在父组件的模板中进行。父组件本身的代码对子组件没有访问权。
如果父组件的类需要读取子组件的属性值或调用子组件的方法,就不能使用本地变量方法。
当父组件类需要这种访问时,可以把子组件作为 ViewChild,注入到父组件里面。Getter Setter
ES6引入了class,以前的javascipt创建实例主要靠construcor,引入class后与java更加相似。同时ES6也保留了getter和setter。
getter和setter分别在使用该变量(即出现在等号右边)(变量名就是函数名)以及改变这个变量值(即出现在等号右边)的时候被调用。1
2
3
4
5
6
7
8
9
10
11
12
13
14
15
16
17
18
19class MyClass {
constructor() {
// ...
}
get prop() {
return 'getter';
}
set prop(value) {
console.log('setter: '+value);
}
}
let inst = new MyClass();
inst.prop = 123;
// setter: 123
inst.prop
// 'getter'所以不可以出现某个类中既有XX名字的变量,也有XX名字的setter和getter,因为会造成循环。常见的做法是将某个变量替换为setter+getter,这样的好处是可以在setter中对变量进行处理。
比如在angular中:
1
2
3
4
5
6
7
8
9
10
11
12
13
14
15
16
17private _fieldJson: any;
@Input() public set fieldJson(value: any) {
this._fieldJson = value;
if (this.fieldJson) {
this.initField();
if (this.editObj) {
delete this.editObj['bindingPBRUri_name'];
}
if (this.data && this.editObj) {
this.editObj['AssociatedGroupUris'] = this.data['AssociatedGroupUris'];
this.editObj['bindingPBRUri'] = this.data['bindingPBRUri'];
}
}
}
public get fieldJson(): any {
return this._fieldJson;
}这里其实就相当于两个变量:fieldJson和_fieldJson,我们通过@input传入的是filedJson,我们通过setter对其进行处理并保存在_fieldJson中,每当我们要使用它时,他又会自动调用getter函数,所以我们用的其实是_fieldJson。